Thursday, August 27, 2015

Grand Vacation Achievers Holiday Cattie Sneak Peek


Christmas is just around the corner and there is no better time to start all of your projects and your cards because the Stampin' Up! Holiday Catalogue starts on 1 September!

The Grand Vacation Achievers are giving you a sneak peek of the awesome stamp sets and products available in this holiday season's cattie.  Here is my card:
I have done something a little outside the box using the Delicate Ornament Thinlet Dies - instead of using them for cutting out either cardstock, designer series paper or a stamped image I have used them to emboss Silver Foil Sheet.

The card is 6" square Night of Navy cardstock base lined with Whisper White and mounted on the front with a square of Silver Fancy Foil Designer Vellum. I love the diagonal lines and associate the pattern with traditional Christmas wrapping papers.

I embossed the Silver Foil cardstock with the three decorative ornaments from the Delicate Ornament Thinlet Dies - I simply turned the thinlets over and placed the cardstock on the non-cutting surface and passed it through the Big Shot.
I stamped the holly image from the Embellished Ornaments on the Silver Foil with Staz On Jet Black ink. I masked the image a little so that I could stamp the holly tumbling over both sides of the ornament. I coloured the leaves with a Mossy Meadow Stampin' Write Marker. I punched out small circles of Red Glimmer Paper using the 3.2mm Circle Handheld Punch and adhered the red glimmer dots with TomBow Glue. I wanted a little aspect to pop.

The sentiment is from Embellished Ornaments in StazOn. I am certain that this set is going to be a global favourite this season as I have already made a few projects in preparation for workshops and classes.

Finally I added the Silver 1.6cm Satin Ribbon bow so that the large ornament would feature as the main focal point of the card.
I hope that you have enjoyed this blog hop and the amazing creations that everyone has come up with. . . until next time!

Happy planning
Shanni xx

Thursday, July 23, 2015

Stampin' Up! Grand Vacation Achievers Blog Hop ~ Colour Me New


Welcome to our brand new blog hop, this month we are all on deck! So very exciting as we have the Grand Vacation achievers here from all of the Stampin' Up! markets. . . I feel very humbled to be in such talented company.

Thanks for stopping by. "Colour Me New" proved to be a real challenge to me as I am still coming to terms with the luscious bright colours that are our new In Colours 2015-17.  I have chosen Mint Macaron and Tip Top Taupe as my feature colours.  This is my project:
I tend to make square cards because I like how they feel (more weighty) and they give me a larger area to create on. . . the base card in this instance is Blackberry Bliss, lined on the inside with Whisper White.  I wanted to create a window box effect so I cut a square of Tip Top Taupe cardstock for the backdrop to the framed and mounted Whisper White front.

I die cut the Whisper White cardstock with the largest framelit from the Lots of Labels Framelit Dies to make a void when mounted over the Tip Top Taupe backdrop. I traced the outline of the perimeter of the framelit on a piece of Blackberry Bliss and trimmed around it neatly. I then removed the centre of the shape with the same framelit to make the narrow outline.
I heat embossed the scattered flowers from the Birthday Blossoms in White Stampin' Emboss on the Tip Top Taupe backdrop. I then mounted the Whisper White front on the Tip Top Taupe backdrop and adhered this to the card base. As a contrast but extension of the theme I stamped the same flowers stamp in Tip Top Taupe on Whisper White cardstock and fussy cut them out. I then stuck them in a manner to overlay the framed edge of the window.
I stamped the fly poo stamp from Gorgeous Grunge in Crumb Cake about the flowers to add a little more focus and detail. The centres of the flowers are highlighted with Gold Dazzling Detail.  I punched little blossoms from Mint Macaron cardstock using the flower from the Itty Bitty Accents Punch Pack. Pearls in the centre tie in the white colour theme and add a touch of luxe.
On a scrap of Whisper White cardstock I stamped the larger bloom from the Birthday Blossoms set in Tuxedo Black Memento Ink and using a Blender Pen and the Mint Macaron and Tip Top Taupe Classic ink pads. I then distressed the flowers with my bone folder for a bit of dimension and applied Crystal Effects to make them pop. The flowers are adhered with dimensionals.  You will see the delicate Gold Metallic Thread looped above and to the bottom right of the flowers. I stuck the thread behind the dimensionals as I was layering the flowers on the card. Economical use of adhesive lol!
I adore the Expressions Natural Elements greetings - this time I have coated the natural timber in Gold Dazzling Detail. The greeting is adhered with Mini Glue Dots.  I tied a double bow using the divine Tip Top Taupe Dotted Lace Trim.

I can't wait to browse the amazing creations that my fellow demonstrators have come up with. Thanks for popping by and I hope to see you again.

Cheers
Shanni xx


Built for Free Using: My Stampin Blog

Thursday, June 25, 2015

Perfect Pairs - Hawaiian Trip Achievers Blog Hop


Can you believe that it's been a month since our last hop? So much has happened, the new 2015-16 Catalogue has launched and there are so many delicious new stamp sets, papers, tools and products! I am excited, my customers and I have been busy working out wish lists (which seem to keep on growing) and I am starting to build up a new collection of favourite stamps and colour combos. . . let me know if you would like a catalogue mailed to you or if I can help with any of your crafting needs.

I am so excited to be part of this month's blog hop.  There are so many talented people amongst the Grand Vacation Achievers and their projects this month are really inspiring!

This month's theme is Perfect Pairs and we needed to pair something from the old cattie with something from the new. Here is my creation:
I have used Kinda Eclectic, Petite Petals and Beautiful Bunch from the old cattie, Butterfly Basics from the Occasions Cattie (now carried over) and paired them with Awesomely Artistic and Birthday Blossoms from the new Catalogue.
The base card is Mossy Meadow cardstock lined inside with Very Vanilla. I mounted the front with Watermelon Wonder cardstock and the base for stamping is another square of Very Vanilla which I embossed with the Brick Wall TIEF. I daubed the edges of the bricks and other areas with Crumb Cake Classic Ink.  The fern leaves from Butterfly Basics is stamped in Mossy Meadow directly onto the textured background as are the little scatter flowers from Awesomely Artistic in Crumb Cake.
I stamped the two flower images from Beautiful Bunch (2 times) and Birthday Blossom and five of the detailed flower from Petite Petals in Black StazOn Ink on Very Vanilla. I then coloured them with Watermelon Wonder with Cherry Cobbler Close to the centres using an aqua painter. I punched the flowers with the Fun Flower, Pansy and Petite Petals Punches (you will see that I coloured outside the lines to the very edge of the punch ~ brave right lol). I daubed the edges with Tangelo Twist to add a bit more contrast to the colours. I then shaped the backs of the petals with a bone folder, stylus and the piercing mat.  I cut one of  the largest flowers into six separate petals and stuck them a little off centre behind the main flower.

I coloured the centres of the flowers in Crumb Cake and then added dots of Soft Suede and White using the Stampin' Write Marker and Gel Pen. I coated them with Crystal Effects to draw the centres out a little.  The leaves from Kinda Eclectic are stamped in Black StazOn Ink, painted with Moss Meadow, fussy cut and shaped with a stylus and piercing mat.  I added silicon (Selley's All-Purpose Sealer) behind the flower petals and the leaves to maintain their shape.

The dragon fly from Awesomely Artistic is stamped direct on the card in Smokey Slate Classic Ink. I stamped a second dragon fly on a scrap of Very Vanilla and fussy cut the wings out, shaped them with a stylus and piercing mat, added silicon to the back to keep the curved shape and adhered the wings on top of the stamped image. The iridescent effect is Dazzling Details..
I love the new Expressions Natural Elements in the new catalogue. This is a great way to add a salutation without stamping. I wanted the greeting to pop so I covered the timber embellishment with Tuxedo Black Memento Ink and adhered it to the card with Crystal Effects.
You can see the dimension in the card - I think it's quite effective and the great thing is that the silicon is light so won't add to postage cost and will avoid being flattened in the process.

I hope you have enjoyed this project and are motivated to try the techniques I have used.  Take the time to check out the rest of the bloggers on the hop - the creations are diverse and awesome! 

Enjoy the rest of the hop!
Shanni xx
Built for Free Using: My Stampin Blog

Tuesday, June 23, 2015

Watermelon Wonder You've Got This

I have been trying to figure out different ways to use the Timeless Elegance DSP without simply sticking it on every single project up front and centre where it deserves to be. . .

Here is today's project incorporating the You've Got This stamp set and the Timeless Elegance DSP.

The base card is Very Vanilla. I mounted it on a square of Basic Black cardstock to frame the card. There is also a square of Basic Black cardstock on top of the base card and then on top of that I have included a square of the Timeless Elegance DSP.

I stamped directly on to the DSP using the leaves from Kinda Eclectic in Jet Black StazOn Ink. I wanted some subtle leaves behind the stamped images which would draw your attention to the central feature. I stamped the floral image from You've Got this in Jet Black StazOn Ink on Very Vanilla cardstock and painted the flower in Watermelon Wonder, Soft Suede and Always Artichoke using an aqua painter. I fussy cut them, chopping off the stem at various lengths.

The opaque layer is of course Vellum cardstock cut to the same size as the DSP. I placed two of the coloured floral images on top of the stamped leaves but behind the central image on the top of the card.  I wanted to use the Watermelon Wonder Dotted Lace Trim but not tie any bows or knots because it would have made the card too busy.  The black strip on top of the lace is Basic Black cardstock which I have distressed and torn apart.

I then located the full coloured image on the front over the vellum and other images and on top of the Trim and cardstock strip.  I coasted it with Crystal Effects to make it extra dominant.
The sentiment "Love This" is from the Project Life Remember This set, stamped in Tuxedo Black Memento Ink on Very Vanilla and punched out with the Large Oval Punch and simply stuck across the stem.  The three black Candy Dots are for added interest.
I wanted to take a photo without the light reflecting on the Crystal Effects so that you can get a better feel for the depth of colour and full shadows created by the Vellum.

Thanks for visiting
Shanni xx
Built for Free Using: My Stampin Blog

Monday, June 22, 2015

You've Got This on Glimmer Paper

 I love all things that sparkle and glitter. . . and I am always looking for different ways to us Glimmer Paper in my projects.  Here is my project today using the You've Got This stamp set:
The base card is Very Vanilla mounted on a rectangle of Basic Black cardstock to frame the card. This card has a number of layers as I wanted a sensation of luxury to prevail despite the simplicity.

I stamped the flower image from the You've Got This stamp set on Dazzling Diamonds Glimmer Paper in Versamark and dusted it with Black Stampin' Emboss Powder. Be careful when you heat the embossing powder, pull up as soon as the embossing powder goes off to avoid melting the paper.  I then coloured the embossed image using Cherry Cobbler and Always Artichoke Classic Stampin' Ink Pads and aqua painter.  Finally when it had dried I fussy cut around the image.  I mounted the image on an oval of Dazzling Diamonds Glimmer Paper using dimensionals.
The Glimmer Paper is mounted on a piece of Vellum Cardstock that I embossed with the Lovely Lace TIEF and mounted on top of a piece of Timeless Elegance DSP - it is a Fancy Fan design in Crumb Cake and White.
Because I love texture I couldn't resist using a piece of the Tip Top Taupe Dotted Lace Trim - I covered the Glimmer Paper and stamped image at the bottom to add to the luxe textures and appeal. The sentiment "just because" is from And Many More, stamped in StazOn Black on Very vanilla, punched with the Word Window Punch and mounted with dimensionals on top of the trim.
Hope that the bling appeals to you too!
Shanni xx


Built for Free Using: My Stampin Blog

Tuesday, June 16, 2015

Timeless Elegance is the Best DSP Ever!

I love, the new Timeless Elegance DSP. It is detailed, appealing and adds interest to any project.  The base colours are Very Vanilla, Basic Black and Sahara Sand but it also complements Smoky Slate and the browns. . . very versatile.

Here is a card made with the DSP in a non traditional way:
Base card Mossy Meadow, mounted with Basic Black cardstock. The top layer is of course Very Vanilla cardstock. I inked the Honeycomb TIEF with Crumb Cake ink and used it as a stamp for the background.  I also added a few splotches from the Gorgeous Grunge stamp set using the same coloured ink . The postal mark from Butterfly Basics is stamped in Lost Lagoon.  The fern leaves from the same set are generationally stamped using the stamp from Butterfly Basics and Mossy Meadow ink.
The roses are from the Timeless Elegance DSP pack. I coloured them using an Aqua Painter and Cherry Cobbler ink. The smaller flowers are coloured using Blushing Bride and the leaves Mossy Meadow.  The charcoal coloured flowers are as they come on the DSP. I then fussy cut around the edge of the pattern to suit the card.  You will see that one flower at the bottom right hand corner isn't even complete, merely a suggestion of a rose.
To add greater depth and shadow to the images I coloured with Cherry Cobbler several times.  I then used the Stampin' Write Marker to redefine the edges of the petals.  The DSP is not really porous so it is essential to be patient when you are painting. I adhered the DSP features with dimensionals.

The Sentiment comes from the Kinda Eclectic set and has been stamped in Tuxedo Black Memento Ink on vanilla cardstock. I simply cut the banner shape to fit and stuck it down with a dimensional. The Pearl Jewels are scattered around for interest.

This DSP is so versatile and inspiring. I am already on my second pack in a week,

Cheers
Shanni

Built for Free Using: My Stampin Blog

Monday, June 15, 2015

A Different Perspective on You've Got This

What I have noticed so far on a lot of blogs is that ever body who uses this set feels the need to combine the hatchered background with the flower image. . . I love the hatchered canvas look and I love the flower but I think that I am going to use them separately most of the time.

Here is today's card using the You've Got This set:

Base card is Crumb Cake card stock mounted with Whisper White and Soft Suede card stocks. I stamped on the top square of Crumb Cake card stock using the floral stamp from You've Got This in Soft Suede. I stamped the one in the centre first, masked it with a post it note cut out of the same image, then stamped the other two.  On the top right hand corner I used the Updated Essentials Piercing Pack, piercing tool and piercing mat to create some faux stitching. then highlighted it with the White Gel Pen.
The back ground flower is from the Awesomely Artistic set that we received at Leadership at Convention - my favourite set already!  I stamped these flowers in Crumb Cake and masked the larger blooms with the post it not cut out.
Using an Aqua Painter I painted the petals  and leaves of the larger blooms using Whisper White Craft Ink. I wasn't particularly careful, just smooshed the colour around. . .I added detail tot he pollen area with the White Gel Pen and also dotted the centres of the flowers in the background to marry in the theme of whitewashing. . .
The sentiment is from the You've Got This set, stamped in Soft Suede and punched out with the extra Large Oval Punch. I wanted to mount the sentiment on another background to lift it a little but didn't like any of the punches or framelits in the range so I modified a piece of Soft Suede card stock with the Scalloped Tag Topper Punch. To make this shape I cut a 5cm x 10 cm  (2"x 4") piece of Soft Suede, inserted in the punch for the topper, removed, fashioned up a false length so that I could re-insert the bottom end of the scrap into the punch and voila the shape you see above. Stick the sentiment down with Dimensionals.

I truly believe it too. . . Good things are going to happen!

Shanni xx

Built for Free Using: My Stampin Blog

Sunday, June 14, 2015

You've Got This - Really. . . I don't feel so confident!

One of the stamp sets we could buy on the pre-purchase as demonstrators was You've Got This. Between Convention, Grand Vacation and then coming back home to school camps, drs appointments, etc I kinda felt like I missed the boat in using the set to its potential. . . And by the time I got onto the internet, there was a plethora of cards and projects and I was feeling a tad overwhelmed.

Here is my first creation with the set:
I heat embossed the floral image with White Stampin' Emboss Powder on Whisper White card stock. I then masked it by stamping the same image on a post it note and covering the embossed image, then stamped over it with the smudge stamp from the Perpetual Birthday Calendar stamp set in Garden Green (stamped off once). I stamped the edge of the card with the hatchered canvas background that comes in the You've Got This set the same way - Garden Green stamped off once.
I dampened the flower and leaves with a clean Aqua Painter to make the paper more porous. I proceeded to colour the flower with Cherry Cobbler and Always Artichoke. After it had dried - be patient it will pay off - I added a little more of each ink to make sure that there was a "water colour" effect.
I coloured all the way to the centre of the flower. I tried to apply the ink to the petals in a way that allowed the greatest depth of colour at the bases of the petals.
The sentiment is from World of Dreams and is stamped in Cherry Cobbler. Of course the base card is Whisper White with a Cherry Cobbler mount to help the flower and sentiment stand out. . .

Hope you get some inspiration from this. .

Shanni xx
Built for Free Using: My Stampin Blog

Saturday, June 13, 2015

Sprinkles of Life - The Newest Rage!

In the past two weeks the most popular stamp set and matching punch in the new 2015-16 Annual Catalogue has been Sprinkles of Life and the Tree Builder Punch. This comes as no surprise as the creations with these little beauties are awesome. . .

Everywhere you look on crafting social media you can spot layered ice creams, sprinkled cup cakes and apple trees with little birdies. . . not to mention rainy clouds, sunny clouds and silver-lined clouds lol!

So it would be remiss of me not to join in the celebration of a cute stamp set and punch. Here's my contribution to the collection:
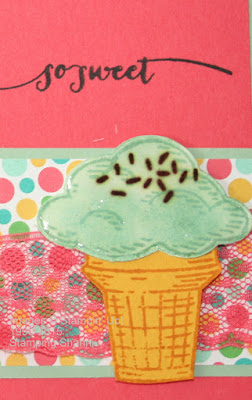
The new 2015-17 In Colours are proving very popular as well. Here I use Mint Macaron, Watermelon Wonder and Delightful Dijon.  My base card is Whisper White mounted on a rectangle of Mint Macaron. I then created a double mount with Mint Macaron and Watermelon Wonder.

Cherry on Top DSP pack is the cutest selection of bright and energetic papers for all types of projects. Here I have mounted a spotty piece on Mint Macaron card stock and tied a piece of the beautiful soft Watermelon Wonder Dotted Lace Trim. The sentiment from Hello Life is a perfect accompaniment for the ice cream. I stamped it in Tuxedo Black Memento Ink.
The ice cream is stamped in Mint Macaron and then I have daubed the card to give it a light and fluffy sense. The sprinkles are stamped in Chocolate Chip ~ couldn't resist! I used the Tree Builder Punch to punch out the ice cream part.  The cone is stamped in Delightful Dijon on Hello Honey card stock as I wanted a contrast. I fussy cut the cone (no punch :-(  but easy- peasy).  I coated the ice cream in Crystal Effects but refrained from using glitter. . . strong I know. I adhered the ice cream cone with Stampin' Dimensionals to create another layer and pop the ice cream.
Inside the card I lined the base card with another piece of Whisper White card cut marginally smaller than the base card because I wanted a little pop up for interest.  This ice cream is stamped in Watermelon Wonder and the one on the right hand edge is stamped in Blushing Bride.
The greatest thing about the Sprinkles of Life stamp set is that from every set sold, Stampin' Up! will donate $3 to the Ronald McDonald House Charities here in Australia - awesome that we are helping others whilst we are having fun with such a terrific set.

My 10 year old daughter has already snaffled the card for a friend's birthday so I know that these are going to be popular with littlies and in-betweens. . .

So cool!
Shanni x
Built for Free Using: My Stampin Blog

Tuesday, June 2, 2015

Amazing Opportunity TODAY ONLY

The new Stampin' Up! 2015-16 Annual Catalogue is released today and for the first time in history it is possible to purchase from three catalogues at one time: 2014-15 Annual Catalogue (Retiring List), Occasions Mini Catalogue and the 2015-16 Annual Catalogue.
 2014-15 Annual Catalogue

 2015-16 Annual Catalogue
And the added bonus is that you can earn the current Hostess Benefits under the 2014-15 Catalogue ($50 for $300 in purchases and up to four half price items) until 11.50pm AEST.

Today is the day to go shopping and make sure that you capitalise on the best priced items that are available, you may notice that the prices in the new cattie are increasing slightly.  All the more reason to shop today.

Click on my shop link on the side bar and enjoy immersing yourself in the amazing craft supplies that are available.

Please note that you can also purchase from the Clearance List (which has new items this week) and the Weekly Deals too!

Cheers
Shanni xx

Sunday, May 31, 2015

Production Line Hawaiian Grand Vacation Swaps

Aloha Peeps!

Thought that I would share some of my last minute preparation with you in the lead up to handing over my swaps at Hawaiian Grand Vacation.

Because my swaps were so bulky they took up a heap of space in our suitcases travelling over to Honolulu. I thought that it would be better to put the together at the hotel rather than carry them made up. I had discovered prior to leaving Australia that the split rings I had for the 3D swaps were too small so I figured that I would buy split rings in Hawaii. . . surely there would be a Michaels lol. Well there wasn't a Michaels on Oahu but there was a Ben Franklins - wow! A story for another time!!

The night before swaps were due I sent the four kids for an ice cream with darling husband and requisitioned one of the beds as a work bench.  This is the sight which greeted DH on his return (and of course I had used his bed hehehe!).
I had left attaching the Simply Pressed Clay Flowers until construction time. . .
The split rings were the easy part as I had pre-punched all of the holes. . .
I had also stuck all of the 3D flowers onto my card swaps and was waiting for the last 12 to dry. . . the other 14 had been inserted into cellophane bags and boxed up for delivery to the Swaps Counter at the Hospitality Room.
Not too shabby when you see them all laid out.

And its only as you are adding the final touches that you see how much time, love and inspiration has been injected into every one.

It is an extremely satisfying feeling when you have a vision, break it into steps and accomplish it to the standard you hope.

Mahalo
Shanni xx

Saturday, May 30, 2015

3D Swap for Grand Vacation Hawaii 2015

In my wisdom I signed up for the Card Swap and 3D Swap for Grand Vacation and then wondered where I was going to magic the designs for them from lol. . .

Traditionally I have received the most amazing 3D swaps from my European friends on Grand Vacation ~ the Germans in particular really rock this style so I was a tad anxious about what I was going to pull together.  I was sitting on our back deck with a lovely glass of white wine while the kids played in the pool, despite being the start of winter here is was quite mild. . . and I looked at the coaster under my glass and had "a moment".

Here is my 3D swap:
A wall hanging with coaster size panels. I made them with the grunge card stock that is in the Glimmer Paper packaging. I embossed pieces of Very Vanilla using the Lovely Lace TIEF and stuck them to the backs of the "coasters.  The front base card on all three panels is Very Vanilla.
Texture and layers appeal to me so that was my fundamental brief. Firstly I stamped the top right hand corner of the base card with the script stamp from By the Tide in Crumb Cake Classic Stampin' Ink. I then embossed the corner of the base card with the Lovely Lace TIEF.

The Blended Bloom was stamped in StazOn Black ink. I coloured the petals with Daffodil Delight and Crushed Curry Classic Stampin' Ink and an aqua painter. The centre was coloured with Baked Brown Sugar Classic Stampin' Ink and I added little elements with a white Gel Pen. I then coated the entire flower with Crystal Effects so that I could daub and stamp over and around it but have the ink resist.
The fern leaves are from Butterfly Basics stamped in Mossy Meadow. I wanted a vivid contrast so stamped the scroll image from Everything Eleanor in Tangelo Twist. The Butterfly is from Papillon Potpourri, stamped in StazOn Black, coloured with Pool Party and Pacific Point Classic Stampin' Inks and an aqua painter. I then punched out the butterfly with the Elegant Butterfly Punch and coated the whole thing with Dazzling Detail.

I wanted to add a sense of luxury and of course no project is complete without bling. . . so this involved the Sahara Sand Lace Trim and the bracket made from punching the edge of Champagne Glimmer Paper using the Decorative Label Punch.  The Basic Pearls are scattered on the project for added interest.
Postage Due is Retiring but I still wanted to use it in the project because it fit my theme. . . so I stamped it in Sahara Sand Classic Stampin' Ink.

The Central flower was made by stamping Simply Pressed Clay with the blossom image from Beautiful Bunch., I then fussy cut the stamped impression and shaped it slightly, let it dry then painted it with inks and an aqua painter. I used Daffodil Delight, Tangelo Twist and Rose Red Classic Stampin' Inks. I then coated the entire flower with Crystal Effects and placed the Basic Pearls in the centre.
For texture on this coaster I embossed the leaves (cut using the Flower Frenzy Bigz Die and Mossy Meadow card stock) with the Lovely Lace TIEF and adhered them with tombow glue. I stuck the flower down with Crystal Effects and added the gold sequins from the Gold Sequin Trim with glue dots. Random pearls add a little more glamour!
Kinda Eclectic is one of my favourite stamp sets ever so I incorporated the leaves from that set in the background here. I stamped them in Mossy Meadow for consistency and of course did generational stamping to get different shades and add to the layering impression. Gorgeous Grunge (fly poo stamp lol) in Crumb Cake and the lattice from Serene Silhouettes in stamped off Garden Green.

Petite Petals flowers were stamped in StazOn Black and coloured using an aqua painter and Rose Red Classic Stampin' Ink. Then I punched them out with the matching punch and shaped them to add dimension. The Basic Pearls in the centres make the project seem richer. . . I also punched out the smaller flowers using the punch from the Itty Bitty Accents Punch Pack and Rose Red card stock (and basic pearls).
The butterfly is from the Papillon Potpourri set, stamped in StazOn Black and coloured with Pacific Point Classic Stampin' Ink and an aqua painter. I punched it out with the Bitty butterfly Punch and coated it with Dazzling Detail.

For texture and added interest I cut some Burlap Ribbon in halves and glued it on using tombow and then accented it with gold Metallic Bakers Twine and more gold sequins from the Gold Sequin Trim.

Of course I needed to add words and what better sentiment than inspire, create, share? The letters were all cut out using the Little Letters Thinlet Dies and Pacific Point card stock. I daubed the edges with Early Espresso.  As a final step I daubered the edges of all the coasters with Lost Lagoon Classic Stampin' Ink. I punched holes with a crop-o-dile and used brass split rings and iridescent blue florist wire for the hanging wire.

I hope that the people I swapped with liked the non-traditional take on the swap theme and hang it somewhere to remind them of the awesome time they had on Hawaiian Grand Vacation 2015.

Mahalo
Shanni xx