Saturday, September 28, 2019

Totally techniques - Chalk Boarding Technique


So great to have you back for another Totally Techniques Global Design Team blog hop. We are featuring chalk boarding technique this month and it is such a fun technique. Very simple, but very effective.

Chalk boarding is usually done on very dark card, with stamping in white. You can choose to use White Craft Ink or White Heat Embossing. I prefer heat embossing because it provides for a sharper image, but I have also employed the Craft Ink in a way that is consistent with chalk boarding.

I have done two simple card projects:
I feature Flourishing Phrases and I have heat embossed with White Embossing Powder on Basic Black card stock. I mounted the top piece on a rectangle of Whisper White and the card base is Basic Black, lined with Whisper White inside.
For the first card I have heat embossed the stamped image and highlighted the flowers of the image only. I used a dry aqua painter to apply Craft Whisper White Ink directly to the card. I stamped the sentiment from the same stamp in Tuxedo Black Memento Ink on Whisper White card and punched with the Timeless Label Punch.
I left the leaves and stems bare for contrast and added some Pearls for a touch of luxe. The pearls marry in beautifully with the chalk style stamping and black and white theme.

For my second project I have used the same stamp and colour scheme but in addition to heat embossing in white I have also distressed over the areas of the stamp image with Whisper White Craft ink, using a sponge. 
I wanted to give the impression that the black board had been used previously and the chalk residue left on the board.
The sentiment in this instance was stamped on Whisper White in Tuxedo Black Memento Ink and punched out with the Story Label Punch.
You can only just see that there are some black Rhinestone Jewels on the card to provide a little glamour!

Such an easy technique and two easy cards for inspiration enjoy.

Until next time
Shanni xx

You are invited to the Inlinkz link party!
Click here to enter

Saturday, September 21, 2019

Fancy Folds - W Fold Cards

Welcome back to another Fancy Folds Design Team blog hop! We are featuring W Fold cards this month and the team is doing an incredible job. If you have just popped by from Gina's blog I bet you were impressed, she has such a beautiful style!

This is my creation this month:
I followed the easy YouTube Tutorial by Stamping with ME, the card is a really easy fold but has quite the wow factor. My base card is Garden Green (its a square 6"x 6"). I lined the front with a square of Mossy Meadow and then a square of the beautiful Garden Lane Designer Series Paper which is available this month on the DSP promo, Buy 3, Get 1 Free.
Arial view so that you can see where the "W" fold comes into play. Basically its panels on the inside. This is what it looks like opened up, the middle panel sits up in a mountain which means it folds closed flat but always has the rise in the centre when its open. I used the Good Morning Magnolia and the Magnolia Blooms sets for the images and for the sentiment I used Here's to Strong Women.
I lined the inside of the card with a square of Mossy Meadow and another square from the Garden Lane DSP I love the lattice feel to this design. On the right hand side I lined the inside of the card with a square of the same DSP and mounted a square of Whisper White to the top of it. 
The centre band which forms the "W" is Garden Green card mounted with another design from the same DSP and mounted with Whisper White on both ends and then the left centre is left bare and the right centre has the sentiment mounted on and oval of Garden Green. The ovals have all been cut using the Layering Ovals.
The magnolias and sentiments have all been stamped with Tuxedo Black Memento Ink. The flowers were coloured using Stampin' Blends in the following colours: Light Flirty Flamingo. Light and Dark Petal Pink, Light and Dark Mossy Meadow, Light Old Olive, Light Soft Suede. I fussy cut all of the flowers post colouring.
I added the little scroll from Good Morning Magnolia when it dawned on me that it would be almost impossible to write on the bottom section of the card.
I added Gold Glimmer Paper features to break up the colours and to add a touch of bling. I cut them using the Christmas Cardinal Dies in Holiday Mini - I love how fine and delicate the leaves are.
I tried to place a different combination of flowers on each panel to add interest and to show off the beautiful magnolia images. Magnolias are really on trend at the moment and its great to work with the two complementary stamp sets.
I added rhinestone jewels to add extra sparkle and interest to the layout. You can also colour the rhinestones using the Stampin' Blends but on this occasion I left them as they come.
I adore this sentiment and plan to use it a heap. It's one of those stamps that you don't notice until someone uses it on a project. I discovered it recently and love every stamp in the set.
The card is quite busy but I hope the DSP and different flowers break up the design and make each feature pop.
A reverse top angle so that you can fully appreciate the internal fold. I simply adhered the panel with Tear n Tape because it has the best stickability.
Looks like a normal card from the front. . .
You can see how the cold and the rhinestones really complement the colours in the magnolias and the DSP. This DSP pack has so many gorgeous designs and they are all subtle tones of greens which look great with any project.
I hope I have whet your appetite and that you feel like experimenting with this great fold, it's easy and has a great impact.

Don't leave us yet though, we have some fabulous projects yet to come. Next cab off the rank is one of our new team members who we are so excited to hop with, Mary Ann Rossiter, you are going to love her project! Mary Ann is so creative!
See you next time!
Shanni xx

Order of the September Hop

Nadine Schweda (Germany)
Aude Barbara (France)

Fiona Carson (New Zealand)
Gina Connor (United Kingdom)
Shannean Moncrieff (Australia) - yay! that's me!!
Mary Ann Rossiter (United States)
Astrid Hofmann (Austria)
Stephanie Nash (Canada)

Saturday, August 31, 2019

Totally Techniques - Embossing Paste


Welcome back to our Totally Techniques Global Design Team blog hop - this month we are featuring Embossing Paste. I love all things textured and I think there is nothing better than layers, and different media, papers and textures in a project.

I hope you are enjoying the hop so far. If I am your first stop, definitely check out the other ream members. We have demonstrators from every market where Stampin' Up! is available.

This is my project:
Square card for something completely different. The base is Cherry Cobbler, mounted with a square of Granny Apple Green, my new "go to" green tone. I then mounted it with a square of Whisper White which I had stencilled first.
I used the Brick Wall stencil from the Pattern Party Decorative Masks pack and Shimmery White Embossing Paste which I mixed with some Golden Glitz Ink Refill (from the new Holiday Mini which is released on 4 September). I simply squirted the re-inker in with the paste, mixed it with the spatula and applied it to the stencil in the usual fashion. It dried in the same amount of time.
The bird image is from the Free as a Bird stamp set, stamped in Memento Tuxedo Black Ink and coloured with Dark Mossy Meadow, Light and Dark Old Olive, Dark Sea Foam and Dark Soft Suede Stampin' Blends. I fussy cut the bird out then stretched it with the bone folder so that it popped out and had more dimension. It is adhered with layered dimensionals.
Nestled amongst the flowers it adds a spot of green that breaks up the pinks and reds and contrasts nicely with the textured brick background. The Scalloped Lace Trim and Iridescent Sequins provide another constrast in texture and sheen.
To a Wild Rose is a divine set to stamp with. It is a three-step stamping set and you can layer up the flowers in deeply contrasting colours or similar shades - it's your choice and every colour combo looks vastly different. What I love about this set is that the images never ever look identical. I stamped the roses in Blushing Bride, Lovely Lipstick and Cherry Cobbler. The centre of the flowers is stamped in Blackberry Bliss. The leaves are in Pear Pizzazz, Granny Apply Green and Mossy Meadow. The images were all stamped on Whisper White card and fussy cut. I even snipped between the petals to be able to bend and texturise the flowers.
The smaller flower images are from the Free as aBird set, stamped in Blackberry Bliss and coloured with the Dark and Light Lovely Lipstick and Dark Petal Pink Stampin' Blends. I fussy cut them and folded the petals up to add to their shape. I thought that the smaller flowers complemented the larger roses, balancing the composition.
Leaves, flowers and lace over-hang the edges of the card to give it a wild and over-grown feel. the flowers sit at differing levels as well replicating nature. 
The sentiment on the outside of the card is from the Free as a Bird whereas the sentiment combination inside is from the To a Wild Rose. Both are stamped with Tuxedo Black Memento Ink.
Hopefully you feel inspired to join us again next month and that you continue on with today's hop. The other members of the team have done some incredible projects and I am certain you will be inspired by every one of them. Go break out the embossing paste and see what you like best!

Until next time, stay sparkly!
Shanni xx

You are invited to the Inlinkz link party!
Click here to enter

Saturday, June 1, 2019

Totally Techniques - Stencil Sponging


Welcome back to another blog hop with the crazy Totally Techniques Design Team, this month we are featuring Stencil Sponging!

This is my project this month:
Surprise, surprise! a square card! 6" x 6" and it was so fun and easy to make! I hope that you are enjoying the other projects on this months hop - we have so many talented people in our Totally techniques Design Team.
I have wanted to work with the Magnolia Lane Suite since I saw it at OnStage in April and have finally gotten the chance.  I also used the laser cut cards from the Bird Ballad Suite.

I followed the tutorial on Splitcoast Stampers YouTube channel by Loll Thompson -it was so easy to follow:
I stencilled the background using a Laser Cut Card from the Bird Ballard Laser Cut Cards & Tin featured on page 168 of the new Annual Catalogue. I sponged the card front using Mossy Meadow, Old Olive and So Saffron Classic Ink Pads and Stamping Sponges. 
The base card is thick Whisper White card, mounted with a square of Mossy Meadow and an additional square of Whisper White which I stencilled direct. I wanted the colours to blend somewhat and look like layered lace doilies.
I stamped the magnolia from Good Morning Magnolia in Tuxedo Black Memento Ink on Whisper White card and coloured the flowers using Light and Dark Petal Pink and Light and Dark Daffodil Delight Stampin' Blends. The leaves are done in Light and Dark Old Olive and the stem in Light and Dark Soft Suede Stampin' Blends.
The sentiment is from the Good Morning Magnolia set as well, stamped on the inside in Memento Ink and I stamped and coloured a smaller magnolia for the same set.
I fussy cut the flowers out once I had coloured them and adhered them to the card front with dimensionals. I punched out the Story Label in Mossy Meadow and cut out the oval around the "thanks" sentiment from the Good Morning Magnolia set in Memento Ink with the Layering Oval Framelits.
I think it worked out quite well. I love the effect of stencilling and think that it can be applied to so many projects - card making and scrapping.

Don't leave us just yet - there's still so much to see! Why not hop along to the next project?

Until next time, stay sparkly!
Shanni xx

https://fresh.inlinkz.com/share/party/fb27843d9b0943a7a6a09e9a68540c9a

Sunday, May 26, 2019

Thinking Outside the Box - Folded Box

Welcome back to another Thinking Outside the Box Design Team blog hop1 I hope you are well and not too busy. . .

This month we are featuring Folded Boxes!
You have probably hopped over from my friend Fiona Carson's amazing blog -I am always blown away by her Fee Fee Stamps creations!

This is my project:
This is a very simple "Box Card" one of the famously collapsable cards that has a box structure in it. I am sure that others have taken a different path on this project but this was the style that I liked most.

I followed May-May's YouTube tutorial which is very simple, but you may also like to follow my step by step instructions.

I used the following stamps and materials:

Everything is Rosy
Country Home
High Tide
Well Said

Thick Whisper White card stock
Night of Navy card stock
Rose Gold Glimmer Paper (Everything is Rosy Suite)
Everything is Rosy 6" x 6" DSP Stack
Pre printed flowers Everything is Rosy

Everything is Rosy Framelits
Layering Ovals Framelits
Pearl Jewels
Rose Gold Shimmer Paint
Wink of Stella

Night of Navy Classic Ink Pad
Smokey Slate Classic Ink Pad
Melon Mambo Classic Ink Pad

The card requires one sheet of A4 card, I have used both metric and Imperial measurements for your ease.
First score your piece on the landscape position at:

Metric: 7.4cm, 14.9cm and 22.4cm
Imperial: 23/4", 51/2" and 81/4"

Next flip it to the portrait position and score at:

Metric: 10.5cm
Imperial: 41/4"

Finally in the portrait position cut the centre of the card from the score line at 7.4cm (23/4") to the 22.4cm (81/4") as per the green line on the diagram.
Using a framelit of your choice cut the shape out of the two middle rectangles. Fold the card portrait to do this step, the rest of the tie the card is folded landscape. I like the Layering Ovals Framelits because they complimented the Everything is Rosy Suite. I cut through both the layers at once. Make sure that you fold your card to ensure that only the two rectangle areas are cut out.
This is what the voice look like. I placed a piece of DSP behind the space so you could see it clearly.
Next step is the brackets for the floating inserts.  This is is a piece of Whisper White scrap that measures - 9.4cm (33/4") x 4 cm (11/2"). With the card in landscape position score in from each side 1cm (1/4") and then in the portrait position cut the piece into 4 equal lengths (1cm or 1/4"). Burnish the score marks squarely. the more precise you are the better the project will come together.
Fold the car in halves so that the cut out voids are both situated like they are above in step 3.  Flip the back over so that the voids are flush on your healing mat and the surface you are working on is the inside of the back cover. With the side of the card facing left and the fold of the strip facing the centre fold of the base card adhere the strips consecutively butting up against each other.
This is what the adhered pieces look like from above all lined up precisely. place glue on each of the folded tabs being careful not to use too much. You may prefer to use glue dots the first time.
Flip the front of the card back over and press the prepared strips to the base of the card with the voids already cut. Sounds crazy but it is really simple and means that your brackets line up every time.
This is what the brackets look like and from a different angle once the flower embellishments are stuck in using glue dots. I chose to use the Everything is Rosy suite because it is available this month only.
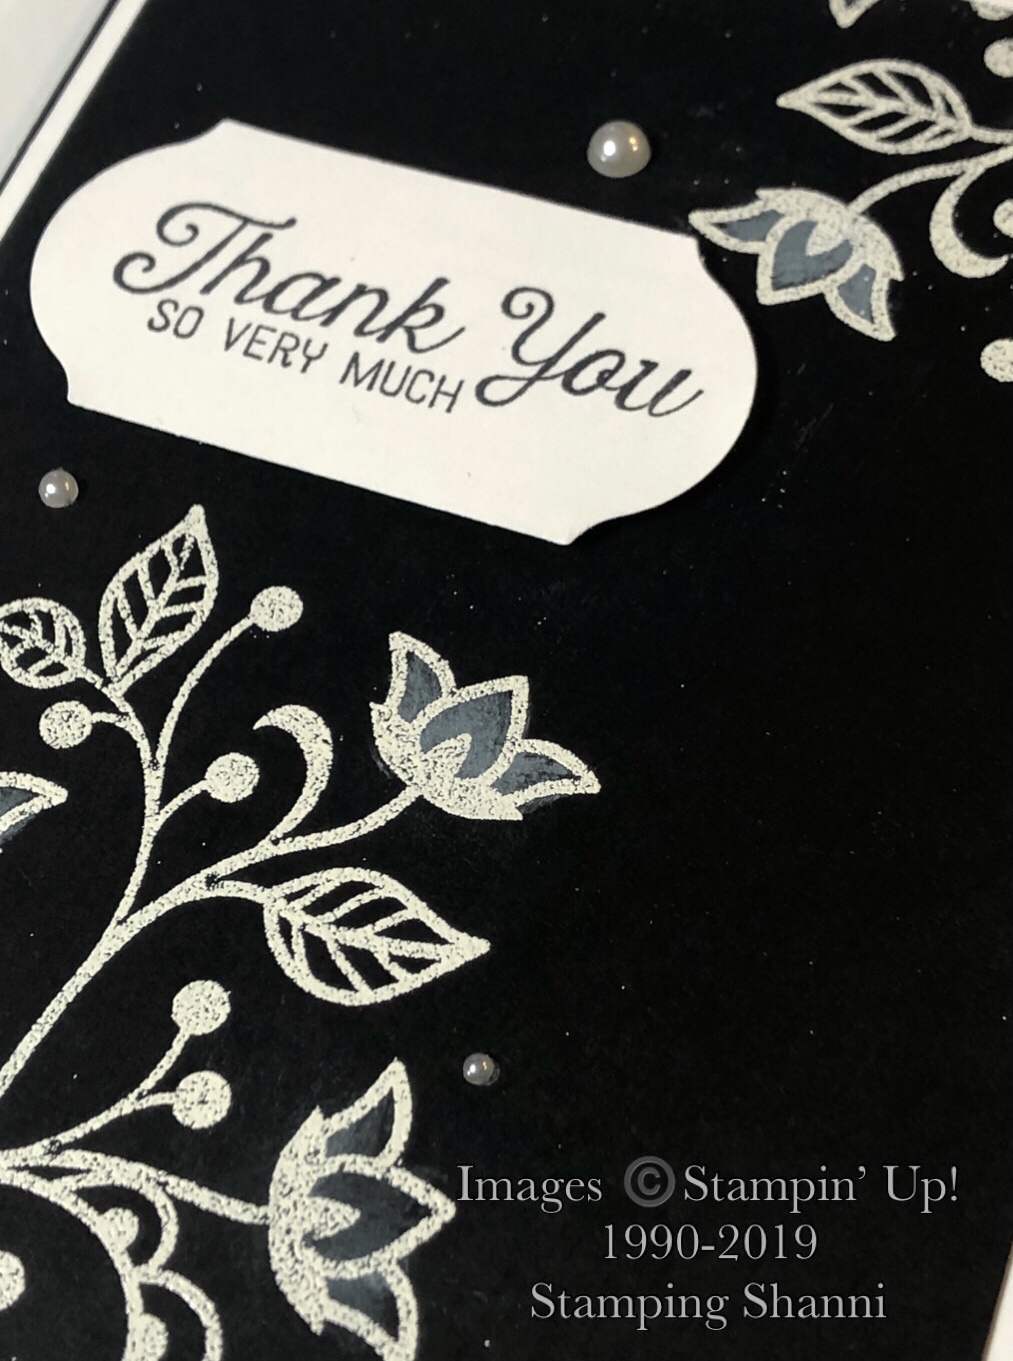
This is the view looking into the box from the side with everything lined up as you would expect it to sit on a shelf. I stamped the sentiment from High Tide in Night of Navy on one of the pre-cut sentiment shapes from the Everything is Rosy suite.
The DSP rectangles are cut from the Everything is Rosy 6" x 6" DSP Stack. I also cut the scalloped edged oval from the Layering Ovals Framelits and the Whisper White Oval is cut from the layered oval. The sentiment on this facet is stamped in Night of Navy using a sentiment from the Well Said set.
I love the contrast in the stark white agains the bokd pink and blue background and the splash of rose gold for contrast.
For the void on the side of the box that is at right angles to the brackets and flower inserts. I cut the oval (the same size as the void) from another piece of DSP from the Everything is Rosy Pack. I wanted to break up the pinks so opted for the marbled Night of Navy and Rose Gold piece.
Another piece of the DSP for the base and contrasting with a strip of the Night of Navy and Rose Gold DSP and then a piece of each of the ribbons that come with the suite - these are stunning, add interest and also texture!
Laying Ovals again with Rose Gold, Night of Navy and Whisper White - I stamped the sentiment from Country Home in Night of navy. I cut the fine leaves with the framelit in the Everything is Rosy Framelits.
The flowers are actually stamped using the Rose Gold Shimmer Paint and a dauber on the larger stamp in the Everything is Rosy stamp set. I stamped the smaller flowers in Melon Mambo and then went over them with Wink of Stella. You can't see the shimmer in the photographs but they look incredible in real life. I also painted some pearl jewels using the Rose Gold Shimmer Paint. They were all cut out using the matching framelits.
The leaves were stamped in Night of Navy and Smokey Slate and cut out with the matching framelits. I adhered the flowers and leaves with glue dots and dimensionals.
This is the full inside of the card - I love that the sentiment lines up through both ovals so it doesn't matter which way you look. And when you look through the oval void towards the last aspect of the card it looks like it is framed by the void as well.
 Final card view!
I hope you are feeling inspired to try this truly simple but dramatic pattern/fold.

Don't leave us just yet, as we have a heap of other awesome projects. Next cab off the rank is my beautiful friend Tanja Kolar! Tanja has a gorgeous project for you.

Until next time, stay sparkly!
Shanni xx

May Blog Hop Order
Shannean Moncrieff (Australia) - that's me!
Tanja Kolar (Germany)
Zoe Tant (United Kingdom)
Annette Elias (Netherlands)
Dena Rekow (United States)
Beate Wacker (Austria)
Aude Barbara (France)
Barb Stewart (Canada)
Fiona Carson (New Zealand)