Saturday, March 31, 2018

Totally Techniques - Crinkled Background

Welcome back to another Totally Techniques Design Team hop! This month we are doing scrunched backgrounds and its a lot of fun, so don't rule it out until you give it a try.  If you have just arrived from Annette's blog you will already know what to expect! How awesome was Annette's project - she is so talented!

These are my creations this month:

I couldn't decide which card to run with and they both have a slightly different approach using the same technique so I decided to go with both.  I followed the simple YouTube video from the Scrappy Blogger - it has universal application and I find that the pigment is really rich in the Stampin' Up! Classic Stampin' Ink Pads so they work a treat.

Card #1
Square card - base card Real Red, mounted with a square of Basic Black to pop the crinkled background which started as a piece of Whisper White card stock which I spritzed and then scrunched. I then added Brusho Crystal Colour - Red, Orange and Yellow. I then spritzed the card a little more to get the colours to blend and left it to dry. The distressed edges happened naturally.  YOu will see that there are veins of colour which are darker than some areas and the Brusho crystals faded out in less distressed areas. 
The stamped images are from Crafting Forever, I stamped them in Tuxedo Black Memento Ink on Whisper White card and again on the terracotta toned wood paper from Wood Textures Designer Series Paper Stack. I coloured the brushes Stampin' Blends and fussy cut them out, along with the pots stamped on the DSP.  
I also love texture so it was my goal to bring in different elements to layer up the card. I am giving it to an artistic person so I want for there to be lots of elements that appeal - colour, texture, design. . .
I adore the Copper Trim that can be unravelled to make netted features. I thought it went well with the colours and the concept of "artiness". I married this textural aspect in with the Copper Foil swirls cut with the Swirly Scribble Thinlits.
I wanted the sentiment to pop so heat embossed the words in white on Basic Black card and simply cut around the image at a reasonable distance. The Gold Glitter Flakes are from the Occasions Mini Painted with Love Suite. The flakes reflect copper because of the red tones of the card.
I used two separate copper foil swirls in the top left corner. They fit perfectly together. The hardest part of making this card was getting everything stuck down - with all the different elements I reverted to Tombow glue. Interestingly the background card is not quite square either by the time it has been crinkled, dampened and dried.
This photo gives you a closer look at the webbing created by crinkling the paper. The photos don't do the technique justice but I hope that it has inspired you somewhat to give it a go. I think my favourite aspect is the coper trim lol.

Card #2
Very simple square card! Base card is Crumb Cake, mounted with a square of Basic Black. The crinkled card is Very Vanilla and I have highlighted the distressed areas with Crumb Cake ink.
Stamped images are from Love You Still and Petal Palette in the Occasions Mini. Stamped the floral image in Tuxedo Black Memento Ink, I inked up the stamp but didn't go all the way to the edge of the pergola posts. I then stamped again from the opposite direction to create a rectangle frame. I fussy cut the frame out including the central area. 
The flowers and leaves were then coloured in Crumb Cake, Blushing Bride and Pool party ink using an aqua painter. I dimensionalised the frame away from the sentiment card using foam adhesive strips. I had stamped the sentiment from Petal Palette on a rectangle of Very Vanilla card that was roughly the same size as the frame. 
I coated the flowers in a layer of the Fine Tip Glue to give a glossy appearance. I added pearls to pop the flowers.
I also cut our some filigree flowers using the Petals and More Thinlit Dies from the Petal Passion Suite in the Occasions Mini. I used Soft Sky card and daubered the edges with Pool Party to tie in the blue theme. These flowers are nestled at adjacent corners of the frame. The final touch to add a little more bling was to add some light pink sequins from Iridescent Sequin Assortment embellishment pack.

I hope that you have gotten some inspiration and enjoyed my projects. I think I will definitely use the technique again for some masculine cards.

Don't leave us just yet! Zoe has got the most adorable Easter card! 

See you next time!

Stay crafty,
Shanni xx


Order of the Hop for March
Annette Elias Netherlands
Shannean Moncrieff Australia (that's me!) 
Zoe Tant United Kingdom
Lynsay Mahon Canada
Nadine Weiner Germany
Paula Dobson New Zealand
Barbara Meyer Austria
Kelly Acheson United States

Sunday, March 18, 2018

Thinking Outside the Box - Box with a Lid

Welcome back to another Thinking Outside the Box Design Team blog hop - this month we are doing hinged lidded boxes. It's going to be a great hop!
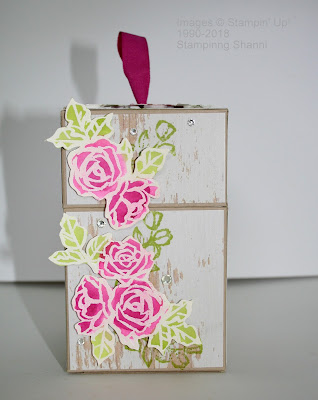
I am starting off this month's hop so lets jump straight in. . . This is my hinged lidded box:
It's quite a sturdy little box and measures about 41/2" tall and is 23/4" square.
And here are the instructions:

1. Score the base sheet of A4 card stock as follows -
The base is a full sheet of A4 card stock (29.8cm x 21cm or 113/4" x 81/4"), I made mine with Crumb Cake card. The sheet is scored landscape at - 7cm or 23/4", 14cm or 51/2", 21cm or 81/4" and 28cm or 11".

Turn the card portrait and score the following - 7cm or 23/4" and 14.2cm or 55/8". Cut between the scored lines as per the red lines and remove the pink hatched strips at the right end.

Burnish all score lines

2. Score the "lid" card stock as follows -
This piece of card is 29.8cm or 113/4" x 15.2cm or 6". Score the card landscape at the following - 7cm or 23/4", 14cm or 51/2", 21cm or 81/4" and 28cm or 11".  And score the card portrait - 4.1cm or 15/8" and 8.2cm or 31/4". Trim the card per the red lines and remove the pink hatched areas.

Burnish all score lines

3. There is an insert inside the box which helps to hold the box firm. I made this with Whisper White card. The piece measures - 28cm or 11" x 18.4cm or 71/4".
Score the piece landscape - 6.6cm or 25/8", 13.2cm or 51/4", 20cm or 77/8" and 26.6cm or 101/2". Then score at portrait at 9.2cm or 35/8". Cut along the red lines and remove the pink hatched area.

Burnish all score lines.

4. Stamp or decorate your base card. I have used the Woodgrain Designer Series Paper Stack. I cut the squares 2mm or 1/16" smaller than the spaces I wanted to place them in.
5. For the lid I have used the same DSP and you will see that I have included a larger square which will be the top layer of the lid.
6. This is what the insert looks like once you have scored and trimmed it.
7. This is what the base card looks like scored, trimmed and decorated.
8. This is what the lid looks like scored, trimmed and decorated.
To stick the box together simply place adhesive on all of the tabs and fold together making sure that you keep all angles square and neat.

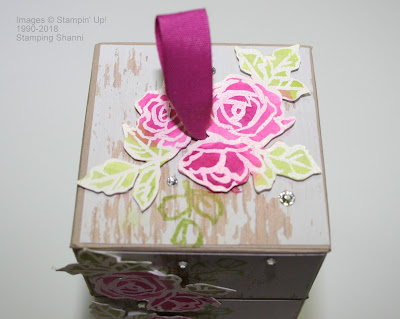
9. To insert a ribbon at the top of the lid before you adhere the lid's top layer punch a small hole with the 1.6mm or 1/16" hand held circle punch. Insert the ribbon (I have used the 1/2" finely woven ribbon in Berry Burst) and adhere it with two pieces of double sided tape. Also place tape all around the perimeter of the lid.

10. This is how the pieces will appear once you have folded and adhered the base and lid sections.

11. This is how you want them to hinge. I always place the corner seam edges together.

12. Using the Label Punch, cut out another piece of card stock to act as the hinge. Score the punched shape horizontally. Burnish the score line.

13. Adhere the hinge device to the base of the box.

14. Adhere the top half to the inside of the lid. You will see how smooth the secure the hinge is.

15. The insert should fit snugly into the box. I suggest using a glue dot on each side just to ensure that the insert stays flush agains the bottom of the box.

16. Next finish decorating the exterior of the box. I have used a very simple approach.
I also stamped directly to the DSP on the box using the leaf stamp from the same set in Lemon Lime Twist ink.  I heat embossed the rose stamp from the Petal Palette Set in White Stampin' Emboss and then coloured the image using Melon Mambo and Berry Burst for the roses and Lemon Lime Twist for the leaves. I fussy cut the roses and adhered them with dimensionals.

17. Despite the fact that the pattern sits over the join on the box it still opens and closes smoothly.

18. The roses serendipitously fit around the ribbon on the lid of the box.


19. I added a few rhinestone jewels to make the whole layout pop.

20. You can see how flush the lid sits against the base.

So I hope you have enjoyed this tutorial and that you don't leave us too quickly. We have so many great projects planned for you today.  Next is Tanja Kolar's amazing blog


Thanks for stopping by!
Shanni xx
Order of the Blog Hop for March
1. Shannean Moncrieff (Australia) that's me!
2. Tanja Kolar (Germany) 
3. Zoë Tant (United Kingdom) 
4. Yoshiko Endo (Japan) 
5. Sharlene Meyer (New Zealand) 
6. Dena Rekow (USA) 
7. Beate Wacker (Austria) 
8. Aude Barbara (France) 
9. Barb Stewart ( Canada)

Thursday, March 15, 2018

Fancy Folds - Double Z Fold Cards

So great to be back for another Fancy Folds Design Team hop. Happy March and it's the last month of Sale-a-Bration so the last opportunity to get a bargain or two!

Satomi's card this month is so beautiful. I hope you enjoyed her ideas. I am always inspired by Satomi's style.

This is my card:
I followed Dawn Griffith's easy YouTube tutorial but changed the measurements out so that the base or back card is square and the top layer was adjusted to be 41/2" x 11" with co-ordinating score lines at half and a quarter.

The base card is Basic Black card mounted with squares of the Petal Passion Designer Series Paper. I love the black and white papers and think that they complement any occasion. You will see that the feature panel on the front or the small "z" is Basic Black also but has been mounted with Whisper White panels.


I stamped the roses image from the Petal Palette stamp set in Tuxedo Black Memento Ink and coloured the roses in Dark Cherry Cobbler, Light Cherry Cobbler, Dark Pink Pirouette and Light Pink Pirouette Stampin' Blends. The leaves were coloured in Dark and Light Old Olive Stampin' Blends. I fussy cut the images. I stamped the images 3-4 times. I cut leaves off and separated the flowers to make them look a little more individual.


Depth and layers on card fronts are one of my favourite things so I cut a Cherry Cobbler circle using the Stitched Edge Framelit Circle and then mounted it with a slightly smaller circle in Whisper White. I dimensionalised this aspect and stuck the roses on with glue dots and kind of draped them over the edges.  I added the remaining roses to the next two panels.
To add texture and interest I also cut a few Silver Glimmer Paper and Basic Black leaves and buds from the Sweet Cake Framelit Dies. I also used some of the silver embossed vellum features from the Sweet Soiree Embellishment Kit.
The sentiments are from the Petal Passion stamp set simply stamped in Tuxedo Black Memento Ink on the card direct and on a piece of Vellum Card and punched out using a label punch. I wanted the suggestion of shadow and texture.
I hope you have enjoyed the project and that you continue on the hop! Check out Tanja's amazing project ~ I love this woman's style!

Until next month! Sparkle like a star!
Shanni xx

Order of the March Blog Hop 
1.Gina Connor (UK) 
2.Satomi Wellard (Japan) 
3.Shannean Moncrieff (Australia) that's me!
4. Tanja Kolar (Germany) 
5.Aude Barbara (France) 
6.Miranda Mols (Netherland) 
7. Astrid Hofman (Austria) 
8.Connie Stewart (USA)