Sunday, May 30, 2021

Totally Techniques -- Layering Stencils Inking

Welcome back to another Totally Techniques Design Team Blog Hop, this month we are featuring layering stencils, using ink on stencils.

This is my project:
I chose to make a square card for something different😉 


These are the sets, tools and materials I used:

Tasteful Touches
Free as a Bird
Basic Black Card stock
Whisper White Card stock
Rose Gold Metallic Specialty Paper
Tuxedo Black Memento Ink
Mango Melody Classic Stampin’ Ink Pad
Pumpkin Pie Classic Stampin’ Ink Pad
Cajun Craze Classic Stampin’ Ink Pad
Blending Brushes
Basic Patterns Decorative Masks
Spritzer
Gilded Leafing
Tombow Glue
Forever Flourishing Dies
Meadow Dies
Elegant Faceted Gems
Stampin’ Blends — Dark Cherry Cobbler, Light and Dark Poppy Parade, Dark Daffodil Delight,
My base card is 6” x 6” Basic Black card lined on the inside with a square of Whisper White. I mounted the outside (the stamped side) with a square of Rose Gold Metallic Specialty Paper — I love a touch of bling!
The rose gold paper is mounted with a square of card which started as Whisper White; this is where the layering stencils came in . . .
I initially blended Mango Melody, Pumpkin Pie and Cajun Craze inks randomly on the card using the Blending Brushes. I made sure there were variations in colour depth and that all the colours merged so that there was no white shining through the ink. I then lay the stencil from the Basic Patterns Decorative Mask over the coloured card and spritzed it with water. You don’t need much water. I left it for say 10 seconds and dabbed off the excess with paper towel.
The water “lifts” some of the colour and makes the pattern appear lighter than the blended coloured background.
Once the stencilled pattern had dried, I lay the same stencil over the top of the pattern, but slightly below the spritzed areas; they are aligned but not identical. I then applied Tombow Glue using a baby wipe in the stencil voids and rubbed the Gilded Leafing over the glue. You brush off the excess.
This combination of stencilling creates the complex background that is both rich and gives the impression of texture because of the water marks. It’s so simple but dramatic. My sister gave me the idea for this in a team swap we held with the release of the new Annual Catalogue.
I stamped the leaf image from the Tasteful Touches set directly onto the background in Tuxedo Black Memento Ink. The flowers were stamped on a scrap of Whisper White card and I coloured them using Stampin’ Blends in the colours listed above. I fussy cut the flowers.
The black leaves were cut using the die from the Forever Flourishing Die set in Basic Black. I adhered them directly onto the background card. You will see that I snipped off a few stems to give the layout a more balanced appearance. The flowers were then adhered and mounted with dimensionals to add depth and interest.
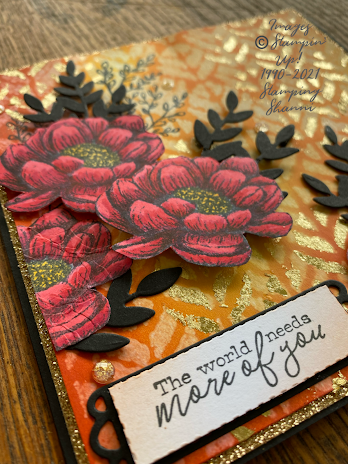
Sentiments can be challenging — I chose this sentiment from the Free as a Bird set. It’s stamped in Memento Ink. I blended some pumpkin pie across the white to make it less stark and I mounted it on the basic black die shape from the Meadow Dies. I actually ran the stamped white card through the same die then cut along the faux stitched line so that it would sit perfectly in the shape.
No card is complete without some bling — I added the hold Elegant Faceted Gems. I felt the little speckled gold and translucent gems married the whole project together.
I hope you feel inspired to try layering stencils, they add a whole new dimension to projects and lend a mixed media feel to the card.

Check out the rest of the design team’s projects — as always they are awesome!

Until next time,
Shanni xx


You are invited to the Inlinkz link party!

Click here to enter

Saturday, May 22, 2021

Fancy Folds Slide & Lock Card


Happy May Folks! I hope that you are enjoying the change in weather and staying busy! Welcome back to another Fancy Folds Design Team blog hop; this month we are featuring Slide and Lock Cards.


This is the easy to understand YouTube instructions from Amanda at ScrimpingMommy I love how simple Amanda’s instructions are. 


This is my project:

These are the stamp sets and tools I have used for the card: 


    Celebrate Sunflowers

    Sunflower Dies

    Forever Flourishing Dies 

    Basic Gray Card stock

    Whisper White Card stock 

    Copper Foil Sheets

    Simply Elegant Specialty Designer Series Paper

    Tuxedo Black Memento Ink


The base card is a square 6” x 6” (6” x 12” dimensions) scored at 3” from either end meeting with a centre opening. I trimmed the smallest slither of each side and mounted each side panel with some of the silver and gold embossed Simply Elegant Speciality DSP.

The lock aspect of the card is made up of 2 x Basic Gray and 2 x Whisper White 4” square pieces. I used White for the slide element because it is marginally thinner than the gray card and slides smoothly in the gap. 


I mounted a square of the simpler designed Simply Elegant Specialty DSP so that it wouldn’t override the background and to avoid clashing. 

Coppery highlights glint from the sunflower cut using the Sunflower Dies — copper foil sheets are the perfect accompaniment to this DSP. The black outline cut with the complementary did tied the element with the background and provides a focal point for the slide. 

Contrasting with the metallic centrepoint, the leaves are stamped in Tuxedo Black on Whisper White - I fussy cut them, and curled them slightly with the bone folder to give them some texture and depth. The black foliage are cut using the Forever Flourishing Dies.


Stamped in Tuxedo black the sentiment is simple and elegant. Mounted on a marginally bigger rectangle of Basic Black, I love that the sentiment can be removed with the slide to leave the card and the written message to die am for themselves. 

I hope you are inspired to give this simple but truly effective card a go. We have so many beautiful stamps and designer series papers which suit this fold design.  Check out what my fellow DT member     has to share! 


Enjoy the rest of the hop and be sure to leave a comment or two! Don't leave us just yet, there is heaps to see,visit my friend


Until next time 

Shanni xx


May Blog Hop Order


Thursday, May 20, 2021

Totally Techniques - Baby Wipes Inking

Thanks for stopping by for another Totally Techniques Design Team blog hop! This month we are highlighting baby wipe stamping, some may also refer to it as baby wipe inking.

Here’s a great link to a quick YouTube tutorial Beata Johns from SplitCoastStampers that explains how to do the technique.

These are my projects:

These are the stamp sets and materials used for the first card:

    All Things Fabulous
    Beauty of Friendship
    Whisper White Card stock
    Blackberry Bliss Card stock
    Blackberry Bliss Classic Stampin’ Ink Pad
    Pumpkin Pie Classic Stampin’ Ink Pad
    Real Red Classic Stampin’ Ink Pad
    Bark 3D Embossing Folder
    Meadow Dies
    Classic Stampin’ Re-inkers — So Saffron, Daffodil Delight, Bumble Bee, Real Red, Cherry Cobbler,     Rich Razzleberry, Blackberry Bliss, Pear Pizzaz, Old Olive and Mossy Meadow
    

These are the stamp sets and materials used for the second card:

    Beauty of Friendship
    Pear Pizzaz Card stock
    Whisper White Card stock
    Blackberry Bliss Card stock
    Blackberry Bliss Classic Stampin’ Ink Pad
    Meadow Dies
    Classic Stampin’ Re-inkers — So Saffron, Daffodil Delight, Bumble Bee, Real Red, Cherry Cobbler,     Rich Razzleberry, Blackberry Bliss, Pear Pizzaz, Old Olive and Mossy Meadow

Obviously I used the same re-inkers and in fact I used the same baby wipes for both projects. This is what the inked up baby wipes looked like. I layered the baby wipes on a flat plastic lid.
For the first card I used a 6” x 6” Whisper White base mounted with a square of Blackberry Bliss, I then mounted that layer with a square of Whisper White which I embossed using the Bark 3D folder.
I stamped the flowers from All Things Fabulous (which are actually three step stamp images) on Whisper White. The first layer was stamped using the baby wipes ink combo. I randomly picked up the merged colours from the baby wipe ink base and was happy that they were a variety of tones. Second step stamp was done using Pumpkin Pie ink pad and the third step was done using the Real Red ink pad. I fussy cut the flowers.
The leaves were stamped from the All Things Fabulous set using the baby wipes. and I kind of liked how there was purple and green tones. These were easy to fussy cut.
Because the flowers and leaves were so busy I wanted to keep the card as simple and stark as possible. I clustered the flowers together and raised two of them with dimensionals. I cut a couple of the leaves apart to make them all look different and nestled them randomly.
Stamped in Blackberry Bliss, the sentiment from the Beauty of Friendship set contrasts nicely with the multicoloured flowers and leaves. I framed the words using the Meadow Dies and mounted the cut out on a rectangle of Blackberry Bliss for drama.
The second card is a 6” x 6” Pear Pizzaz, mounted with a square of Whisper White then with another square of Pear Pizzaz. If I made this card again, I think I would stamp the top card with some random sparse flowers, dandelions or thistles.
To create the wildflowers I lay Whisper White card directly on the inked baby wipes and rubbed the card to encourage the absorption of colour. I then cut the flowers using the Meadow Dies and arranged them randomly on the Pear Pizzaz base card. Some are flush with the base and others dimensionalised.
I quite like the stippled colour and combinations which look abstract and at the same time are clearly meadow flowers.
I tore the green inked card to make the ground beneath the sentiment simply because I had some mossy meadow inked card left over.
The sentiment from the Beauty of Friendship set was stamped in Blackberry Bliss on Whisper White and hand cut and mounted on Blackberry Bliss card for contrast.
I hope that you will consider trying this technique as it’s simple and impactful.

Don’t leave us yet, there are so many different projects using this technique, my good friend Zoe Tant in the UK did the most beautiful project!

I hope you get inspired.

Stay glittery,
Shanni xx

Order of Totally Techniques Design Team Blog Hop

Zoe Tant United Kingdom
Nadine Weiner Germany
Kelly Acheson United States
Barbara Meyer Austria
Annette Elias Netherlands
Shannean Moncrieff Australia (that's me!)