Saturday, October 28, 2017

Totally Techniques - Playing with Paste

I love this month's techniques with the Totally Techniques Design Team. I hope that you are having a crafty time and that all is well in your world.  I always love Nadine's projects and hope you do too.

Because we are showing "Playing with Paste" this month I have included a few of my projects. You know I love texture and you layering so this is the perfect brief for me to have a little fun.

Here is my first project:
A very simple card. The base is Lemon Lime Twist and for a change it is a standard C6 size card. I mounted the base card with a rectangle of Basic Black and stamped on Shimmery White card stock.
The flower from Birthday Blooms is heat embossed in Black Stampin' Emboss and coloured with an aqua painted in Berry Burst, Lemon Lime Twist and Old Olive.
I smeared the area around the flower with Embossing Paste and the diamond shaped spatula. I wanted to add texture and draw attention to the flower.
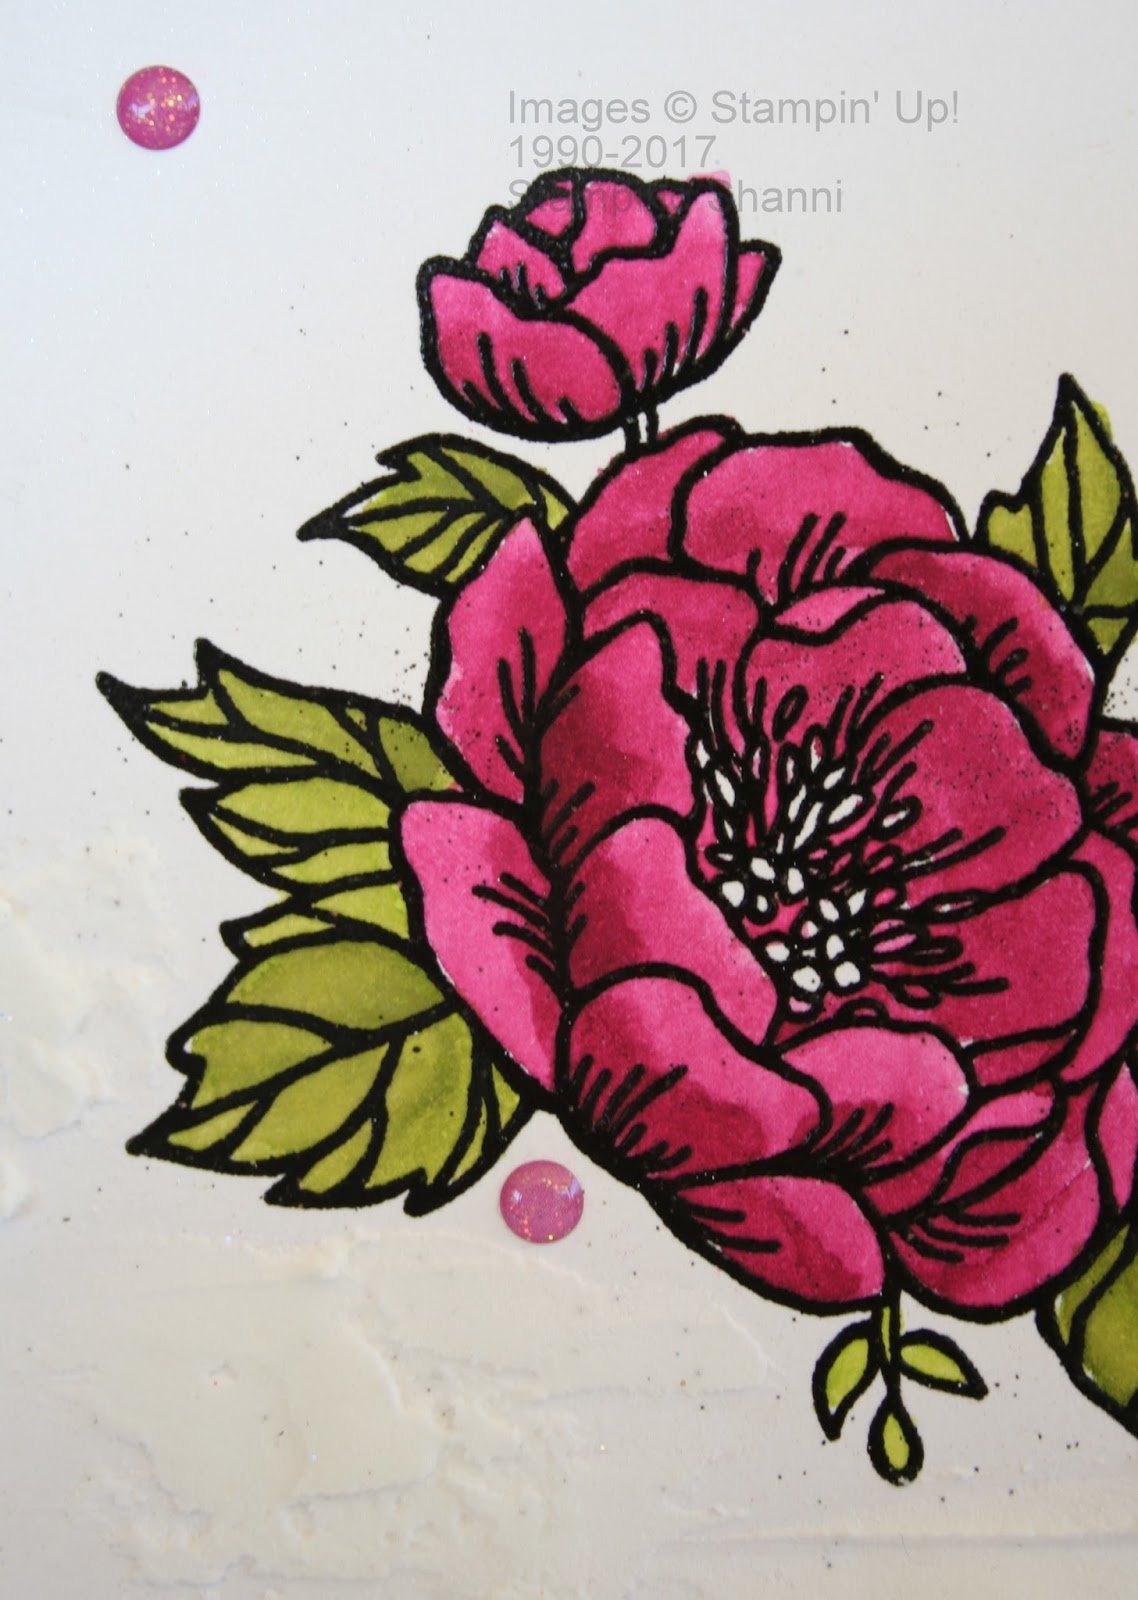
The paste adds depth to the card which I know sounds funny but I wanted to copy the painting trend of layering gesso, oils and pastes on the background of the card to add a complexity that the simple flower loses without this little extra.

My next project is more Christmas oriented and is a 6" square, Thick Whisper White card stock base, lined with a square of Basic Black and stamped on Whisper White:
Again I am doing something a little different, I used a Foil Snowflake from the Holiday Cattie as my template and spread the Embossing Paste over the snow flake using it as a stencil. 
I then sprinkled the Embossing Paste with Dazzling Diamonds and allowed it to dry. This is the hardest part as you just want to get on with making the card and need to be patient!
The Sentiment is from Snowflake Sentiments and stamped in Black Tuxedo Memento Ink. This set has some beautiful sentiments that are heartfelt and beautiful ~ in fact I think its my favourite set this season. Seasonal Lantern is another set which will get a lot of use both over the Holiday Season and beyond especially if you like vintage cards and steam punk style themes.
Here I have used the Lantern Builder Framelit Dies to cut out the black lantern, I lined the lantern with a piece of vellum card stock and stamped the candle on a separate piece of Whisper White card stock. I coloured the candle with Soft Sky, the flame in So Saffron and the area around the candle in So Saffron but a lighter hand. . . I wanted the candle to be subtle. I then added just a touch of Wink of Stella clear to the front of the vellum. The lantern is built using the Foam Adhesive Strips which sit off the cardbase just that little bit more.

My final card that I will share today is using the Embossing Paste in the manner suggested in the catalogue, in conjunction with the Pattern Party Decorative Masks:
This is an easel card, its 6" square Blushing Bride layered with a square of Old Olive and mounted with a square of Whisper White for stamping.
I used the brick wall mask and like to leave the edges a little half hazard. I think that the texture is much more fun when its not uniform.
The sentiment is from Layering Love, stamped in Garden Green on Whisper White. I cut out the oval using the Layering Oval Framelits, I mounted this on a oval cut with the Stitched Shapes Framelits in Blushing Bride to pop the sentiment off the page. It is stuck down with dimensionals.
The pine leaves were cut using the Pretty Pines Thinlits and Garden Green cardstock. The Old Olive Leaves are punched out using the new Leaf Punch from the Holiday Mini and the larger flowers were cut out with the May Flowers Framelits in Whisper White and daubed with Blushing Bride. The smaller Blushing Bride flowers were cut out using the Bloomin' Heart Thinlits. For the added touch of glam I added Silver Faceted Gems and Rhinestone Jewels.
For the easel aspect I added a pice of Whisper White card as a liner and the additional flowers for the "stopper" wedge.  I love that the texture of the Embossing Paste contrasts with the smoothness of the oval cut sentiments and complements the dimension of the flowers.

Hope that you are feeling inspired and excited to break out the Embossing Paste - its lots of fun and provided you replace the lid tot he jar immediately post use it will give you hours of enjoyment.

So a recap of the different styles of cards:


And don't leave us just yet. . . you are going to love Zoe's gorgeous projects!
Until next time, add some glitter, its the spice of creativity!
Shanni xx

Order of October Blog Hop
Patrice Halliday-Larsen (New Zealand)
Nadine Weiner (Germany)
Shannean Moncrieff (Australia) that's me!
Zoe Tant (United Kingdom)
Barbar Meyer (Austria)


Saturday, October 21, 2017

Thinking Outside the Box - Chocolate Dispenser

Welcome to our first Thinking Outside the Box Design Team blog hop. I am so excited to be joining with this incredible group of ladies in our first foray into bringing you free instructions for boxes, packaging and wrapping using Stampin' Up! products and helping you to think outside the box when it comes to your next project.

Check out our design team members who represent every country where Stampin' Up! is sold globally. These team members will bring you an innovative and exciting project each month so keep an eye out for us on Pinterest and stop by every month on the third Sunday. . .
Our first project has a little bit of a national flavour as we wanted to showcase not just talent but a favourite chocolate or candy from our country that would be easily recognisable to everyone!
This is my project:
Here are the instructions:

1.  You will need to use 12" x 12" card stock for the sized box that I have made (Cadbury's were not very considerate of the crafting world when they released Caramello Koalas!)
2.  Cut a rectangle of card 31/2" x 12", using your Simply Scored, score the card at 21/4", 53/4", 8" and 111/2" and again with the card stock portrait score at 1/2".

3.  Cut on the score lines as per the plan - the orange dotted lines:
Using the 21/4" circle from Layering Circles Framelits cut a semi circle from the narrow panel as marked with the orange dotted line.
  
4.  Choose your stamps and decorate the panel.
I used the pine leaves from Christmas Happiness stamped in Old Olive and the reindeer from Seasonal Chums in Memento Black. I also stamped an extra reindeer on a piece of whisper white card stock to fussy cut.  I proceeded to colour the reindeer with our Stampin' Blends - used Light and Dark Crumb Cake, with the Colour Remover and Light and Dark Cherry Cobbler  

5.  The lid is as per the pictorial instruction above. I cut a piece of Old Olive 43/8" x 51/2". Score the card 1" on each side and snip the scored lines in 1" and trim the card on an angle.
This is how it will sit:
6.  This is the base requirement for the dispenser part of the box:
I chose to make the base in Whisper White card stock, basically the base ends up the same size as the box perimeter so 21/4" x 31/2". Cut along the orange dotted lines and score where the dark blue lines are. Stick the base to the box with a heavy duty tape like Tear & Tape Adhesive. The triangles on each side of the scored area slip back into the semi-circle void which you slit on each side up to about 11/2" mark.

7.  This is what it should ultimately look like: 
8. Decorate to your taste.


I also used Striped Ribbon, Merry Little Labels, Everyday Label Punch, Mini Ornaments, Green Sprigs and Black Rhinestone Jewels to decorate the top of the box. 

Enjoy! And seriously consider making this box. It's really simple.  Don't leave us yet though. . . we have so much more planned. Check out Tanja's incredible dispenser!

 
Hugs
Shanni xx

Order of Blog Hop
Shannean Moncrieff (Australia)
Tanja Kolar (Germany)
Yoshiko Endo (Japan)
Zoe Tant (United Kingdom)
Annette Elias (Netherlands)
Dena Rekow (United States)
Sharlene Meyer (New Zealand)
Beate Wacker (Austria)
Aude Barbara (France)
Barbara Stewart (Canada)

Saturday, October 14, 2017

Fancy Folds - Wiper Card

Happy October Folks - it's so great to be doing another blog hop with the international Fancy Folds Design Team, you probably just popped by from Martha's blog - I love her project. Martha is always so clever!

This is my card this month:
I followed the YouTube Tutorial by Beate Johns which was so easy to follow but I changed out the dimensions ever so slightly to make the card with a full piece of A4 card stock - the dimensions ended up being 10.5cm x 29.8cm. I scored each piece of card at 4.5cm and 9cm. And the wiper card is 4.5cm x 9cm as well, scored at 4.5cm and also diagonally.

The base card is Soft Suede and I mounted the front and the back with a rectangle of Early Espresso, then a rectangle of Old Olive and then the Whisper White canvas for stamping.
I stamped the sunflowers from Painted Harvest in Crushed Curry and Soft Suede on a separate piece of Whisper White card and fussy cut them out. I stamped the centres of the flowers in Soft Suede, cut them out and dimensionalised them on the flowers.
The stamped leaves are done in Old Olive and second step stamped in Early Espresso then punched out with the Leaf Punch. I also contrasted some other leaves in Old Olive using the Eclectic Layers Thinlits. I drew a border around the edge of the white card with a Soft Suede Stampin' Write Marker.
The sentiment is stamped in Early Espresso on Whisper White and cut out with the Stitched Shape Framelits. I dimensionalised the sentiment off the card base too and to add contrast I added a small piece of Painted Autumn Designer Series Paper behind it. The "netting" behind the flower is a piece of Copper Trim stretched and adhered with glue dots.
To add contrast and interest to the whole card layout, I used another piece of the Painted Autumn Designer Series Paper to the first panel on the front. I then stamped on a piece of Old Olive using the fern stamp from Painted Harvest in Early Espresso. I daubed the edges with Old Olive to tone the panel in with the balance of the card.
I decorated the panels on the reverse of the card in the opposite order. I wanted to bring more colour and pattern closer to the flower on the white area where you would write.
The sunflower is stamped in the same colours as the front flowers (again they were stamped on a separated piece of card stock then fussy cut). I did the leaves in Early Espresso on Old Olive and punched them out with the Leaf Punch. The sentiment is stamped in Early Espresso direct on the card.
The wiper element is stamped with the fern stamp from Painted Harvest in Old Olive. I then stamped the bee from Touches of Texture in Early Espresso both on the card base and again on a separate piece of Whisper White, I coloured the bee with Crushed Curry and an Aqua painter, then fussy cut it out and stuck it over the base stamped image. I added a touch of Wink of Stella to the wings.
I wanted the wiper to be an extension of the scene of the flowers so the white card is moiunted on Old Olive and Early Espresso. The Black Rhinestone Jewels are scattered to add interest and a touch of texture to the layout.
I hope you can see the dimension in the wings of the bee from this angle. 
And you can see the dimension in the reverse side of the card too.

I hope that you feel inspired to try this fold because it is really easy and the options and selections of stamp sets and designers series papers at the moment are really well suited especially for the holidays. I know that the other members of the Design Team will have inspired you with their projects too.
Good luck and don't leave us yet because Aude's amazing project is next! I love it and know you will learn a lot about the fold and options.


Thanks for popping by, see you next time!
Shanni xx

Order of Blog Hop for October
2. Monica Gale (UK) 
3. Satomi Wellard (Japan) 
4. Martha Inchley (Canada) 
5. Shannean Moncrieff (Australia) 
6. Aude Barbara (France) 
7. Miranda Mols-Heidenrath (Netherlands) 
8. Astrid Hofmann (Austria) 
9. France Martin (USA)