You might have just popped in from Barb's blog - isn't her project incredible?! Or you might have started with my blog - thank you!
This is my project:
I have approached this in a really basic and easy to make fashion, simply because if you are like me you might be light on time this Christmas and still want to do things to make your packages pretty.
I have used the following materials:
Year of Cheer Specialty Designer Series Paper
Copper Foil Card
Whisper White Card Stock
Soft Suede Ink Pad
Silver Mini Tinsel Trim
Year of Cheer Silver Embellishment
Mini Tassel Assortment (Gold)
Gold Metallic Thread
Silver Faceted Gems
4 brads
These are the tools that I needed:
Paper Trimmer
Simply Scored
Season to Sparkle Stamp Set
Stitched Edge Framelits
1/16" Hand Held Circle Punch
Layering Ovals Framelit Dies
Corner Rounder Punch
I trimmed the selected sheet from the Year of Cheer Specialty DSP pack to be 12"x 9" and cut 1 strip of Copper Foil card at 1"x 12", then cut the foil in halves at 6" (so you have two pieces 1'x 6") these are the features at the top edge of the bag.
This is how the piece is to be scored and trimmed:
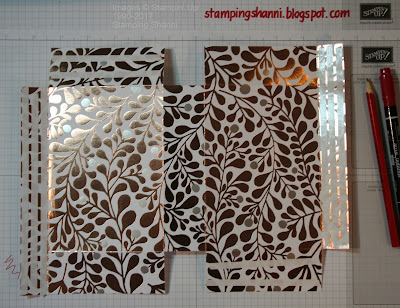
Portrait ends scored at 1". Landscape edges scored at 11/2". Placing the paper landscape in the Simply Scored, score at 53/8" and again at 65/8".
This is what the DSP looks like once you have done all your scoring. Know that you can adjust the width of the box to suit what you want to insert into the bag by changing the base measurements (the scores that are in the middle of the case card).
This photo is looking at the reverse side of the DSP with the trimmed edges folded in and the Copper Foil card adhered to the edges of the card and the extra corner's removed.
This is the right side of the DSP showing where I have added Tear and Tape Adhesive. The areas at the left and right ends of the photo are where the Copper Foil is stuck on the reverse.
These are the strips that ultimately become the handles of the bag. The copper Foil is 12"x 7/8" and the DSP is 116/8"x 5/8". I rounded the corners on all 4 pieces and adhered them together.
You construct the bag part of the project first and then adhere and decorate the handles.
I adhered the handles direct to the bag with adhesive, then pierced the handles and the bag with the hand held punch and used a brad to secure the handles even further. I added the Silver Faceted Gems over the top of the brads to marry in with the project.
Here is a rear view. I actually like how the faceted gems and the DSP complement each other.
This is a view from above so that you can see how neat the bag is inside with no edges to catch on the gift that you might like to place in it. It's the perfect size for a pack of cards, some boxes of embellishments or a box of chocolates. . .
I wanted to add a sentiment so stamped the words from the Season to Sparkle stamp set in Soft Suede ink on Whisper White card and then cut the oval out using the Layering Ovals Framelits. I then mounted the sentiment on a further oval cut from the Copper Foil card using the Stitched Edge Framelits.
I placed the sentiment in the same way that a label would be placed on a real bag. I also added a tassel for a bit more bling. For this I used the Silver Mini Tinsel, a gold tassel from the Mini Tassel Assortment in the Annual Catalogue. I tied them together with some Gold Metallic Thread and threaded on a silver embellishment from the Year of Cheer Embellishments.
I hope you like the finished project and realise how simple it is to make. I would encourage you to try to make one for any gifts you are wanting to give over the Christmas and Holiday period. . .
Don't leave us just yet, you are going to be blown away by Tanja's totally awesome project - this woman is incredible!
Until next month, add some glitter to it ~ it will make you happier!
Shanni xx
Blog Hop Order December
1. Shannean Moncrieff (Australia) that's me!
2. Tanja Kolar (Germany)
3. Yoshiko Endo (Japan)
4. Zoe Tant (United Kingdom)
5. Annette Elias (Neterlands)
6. Sharlene Meyer (New Zealand)
7. Aude Barbara (France)
8. Barb Stewart (Canada)
2. Tanja Kolar (Germany)
3. Yoshiko Endo (Japan)
4. Zoe Tant (United Kingdom)
5. Annette Elias (Neterlands)
6. Sharlene Meyer (New Zealand)
7. Aude Barbara (France)
8. Barb Stewart (Canada)


