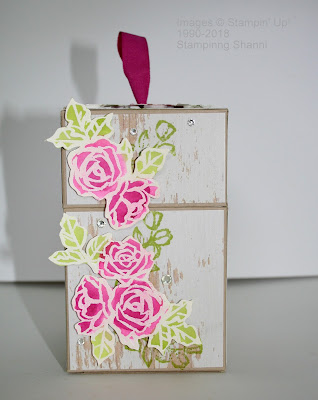
I am starting off this month's hop so lets jump straight in. . . This is my hinged lidded box:
And here are the instructions:
1. Score the base sheet of A4 card stock as follows -
The base is a full sheet of A4 card stock (29.8cm x 21cm or 113/4" x 81/4"), I made mine with Crumb Cake card. The sheet is scored landscape at - 7cm or 23/4", 14cm or 51/2", 21cm or 81/4" and 28cm or 11".
Turn the card portrait and score the following - 7cm or 23/4" and 14.2cm or 55/8". Cut between the scored lines as per the red lines and remove the pink hatched strips at the right end.
Burnish all score lines
2. Score the "lid" card stock as follows -
This piece of card is 29.8cm or 113/4" x 15.2cm or 6". Score the card landscape at the following - 7cm or 23/4", 14cm or 51/2", 21cm or 81/4" and 28cm or 11". And score the card portrait - 4.1cm or 15/8" and 8.2cm or 31/4". Trim the card per the red lines and remove the pink hatched areas.
Burnish all score lines
3. There is an insert inside the box which helps to hold the box firm. I made this with Whisper White card. The piece measures - 28cm or 11" x 18.4cm or 71/4".
Score the piece landscape - 6.6cm or 25/8", 13.2cm or 51/4", 20cm or 77/8" and 26.6cm or 101/2". Then score at portrait at 9.2cm or 35/8". Cut along the red lines and remove the pink hatched area.
Burnish all score lines.
4. Stamp or decorate your base card. I have used the Woodgrain Designer Series Paper Stack. I cut the squares 2mm or 1/16" smaller than the spaces I wanted to place them in.
5. For the lid I have used the same DSP and you will see that I have included a larger square which will be the top layer of the lid.
6. This is what the insert looks like once you have scored and trimmed it.
7. This is what the base card looks like scored, trimmed and decorated.
8. This is what the lid looks like scored, trimmed and decorated.
To stick the box together simply place adhesive on all of the tabs and fold together making sure that you keep all angles square and neat.
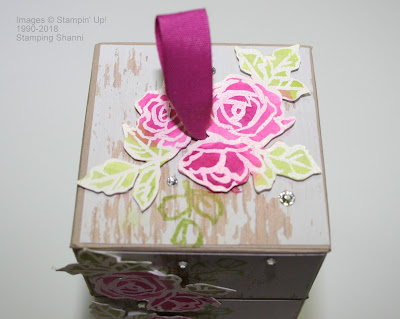
9. To insert a ribbon at the top of the lid before you adhere the lid's top layer punch a small hole with the 1.6mm or 1/16" hand held circle punch. Insert the ribbon (I have used the 1/2" finely woven ribbon in Berry Burst) and adhere it with two pieces of double sided tape. Also place tape all around the perimeter of the lid.
10. This is how the pieces will appear once you have folded and adhered the base and lid sections.
11. This is how you want them to hinge. I always place the corner seam edges together.
12. Using the Label Punch, cut out another piece of card stock to act as the hinge. Score the punched shape horizontally. Burnish the score line.
13. Adhere the hinge device to the base of the box.
14. Adhere the top half to the inside of the lid. You will see how smooth the secure the hinge is.
15. The insert should fit snugly into the box. I suggest using a glue dot on each side just to ensure that the insert stays flush agains the bottom of the box.
16. Next finish decorating the exterior of the box. I have used a very simple approach.
I also stamped directly to the DSP on the box using the leaf stamp from the same set in Lemon Lime Twist ink. I heat embossed the rose stamp from the Petal Palette Set in White Stampin' Emboss and then coloured the image using Melon Mambo and Berry Burst for the roses and Lemon Lime Twist for the leaves. I fussy cut the roses and adhered them with dimensionals.
17. Despite the fact that the pattern sits over the join on the box it still opens and closes smoothly.
19. I added a few rhinestone jewels to make the whole layout pop.
20. You can see how flush the lid sits against the base.
So I hope you have enjoyed this tutorial and that you don't leave us too quickly. We have so many great projects planned for you today. Next is Tanja Kolar's amazing blog
Thanks for stopping by!
Shanni xx
Order of the Blog Hop for March
1. Shannean Moncrieff (Australia) that's me!
2. Tanja Kolar (Germany)
3. Zoë Tant (United Kingdom)
4. Yoshiko Endo (Japan)
5. Sharlene Meyer (New Zealand)
6. Dena Rekow (USA)
7. Beate Wacker (Austria)
8. Aude Barbara (France)
9. Barb Stewart ( Canada)


Beautifully girly Shannean. Perfect for girls all ages as a gift box of trinket box for a bedroom. Zoe x
ReplyDeleteSo so beautiful and romantic. Your box doesn´t look, like you crafted it... so professional. It blow´s me away. Great work.
ReplyDeleteThank´s for being part of this amazing and talented design team.
Hugs Tanja
This is so beautiful and I love the vintage feel that it has! I love that, this is a beautiful box!
ReplyDeleteOh I love how pretty & shabby chic your box is Shannean - beautiful! Thanks so much for sharing!
ReplyDeleteThis is beautiful!! I love how you made the HINGE!
ReplyDeleteJust the same box and even different. It´s so beautiful! This shabby look is great!
ReplyDeleteBeate