Wednesday, March 7, 2012

Awash with Flowers - PC - Colouring Outline Inked Images

The final three cards that I made using this set this week employed the same colour scheme of Rose Red, Not Quite Navy and River Rock.  I wanted to see how different the cards would look by varying the technique slightly.

Firstly I coloured the outlined image in using Stampin' Write Markers and blender pens.  I am quite happy with the result.

The next card I stamped the petal card in a mirror image of itself on white card stock and made three separate flowers.  I coloured these in using an aqua pen and ink pad, I layered the colour to give depth and dimension to the petals.  I stamped the leaves on River Rock card stock and coloured them in with Not Quite Navy ink.  I then stuck the flowers and leaves to the base, placed little 1/2 inch circle punch centres in Rose Red to the middle of each flower and embossed the piece using the Sizzix Square Lattice embossing folder. This gives a great effect - I call it the kitchen towel embossing folder as the texture reminds me of paper towels.


I was surprised at how nice this sweet colour combination worked.  Gotta love the Stampin' Up! Colour Coach - the best little investment you can make to ensure that colour schemes are easy on the eye.

The final card that I made this week with the Awash with Flowers was very simple.  I stamped the petals image in a mirrored fashion on white card stock as per the above card, coloured them in using an aqua pen and Rose Red ink pad.  I stamped the leaves outline on River Rock and coloured them with Not Quite Navy.  I cut the flowers and leaves out and mounted them on the card base around the greeting banner.  I used a button in the centres of the flowers (this is because the outlines overlap and don't look that great) and sprayed the whole project with Frost White Shimmer Paint spritzer.


Enjoy!
Shanni

Awash with Flowers - PC - Using the Large Petal Stamp Only

The Awash with Flowers is a two step stampin set.  Stampin' Up! were the first stamping company to come up with the concept of two step stamping.  For those who are a little confused by what this refers to it is quite simple.  One stamp is a solid image and the second stamp (which is stamped over the top of the first stamped image) is the outline or the detail; in order to have a complete image you need to stamp with both stamps and there are two steps.

Here is a card using the two steps.  I have used a creative colour combination of More Mustard, Elegant Eggplant and Garden Green - I was trying to work out how to bring more Elegant Eggplant into the card but decided that I liked in "clean".


The beauty of this stamp set is that you can colour the outlined stamp images in many ways and each time it results in a unique image. 

On this next card I have coloured in the petals using an aqua pen and ink pad.  I ahve tried to layer the colour so that it adds depth to the image.  Once again I forced myself to use pink - you aren't going to believe me when I tell you it's not my favourite colour are you?


I incorporated the I (Love) Love jumbo wheel on this card as I felt the background needed something to break the solid colour. I stamped pink on pink.  The leaves are of course the beautiful Sizzlets Little Leaves which I use on nearly every flower card I make.  The creative colour scheme is Melon Mambo, Old Olive and Elegant Eggplant.  I have stuck the Melon Mambo grosgrain ribbon upside down to hide the white polka dots.

Cheers
Shannean

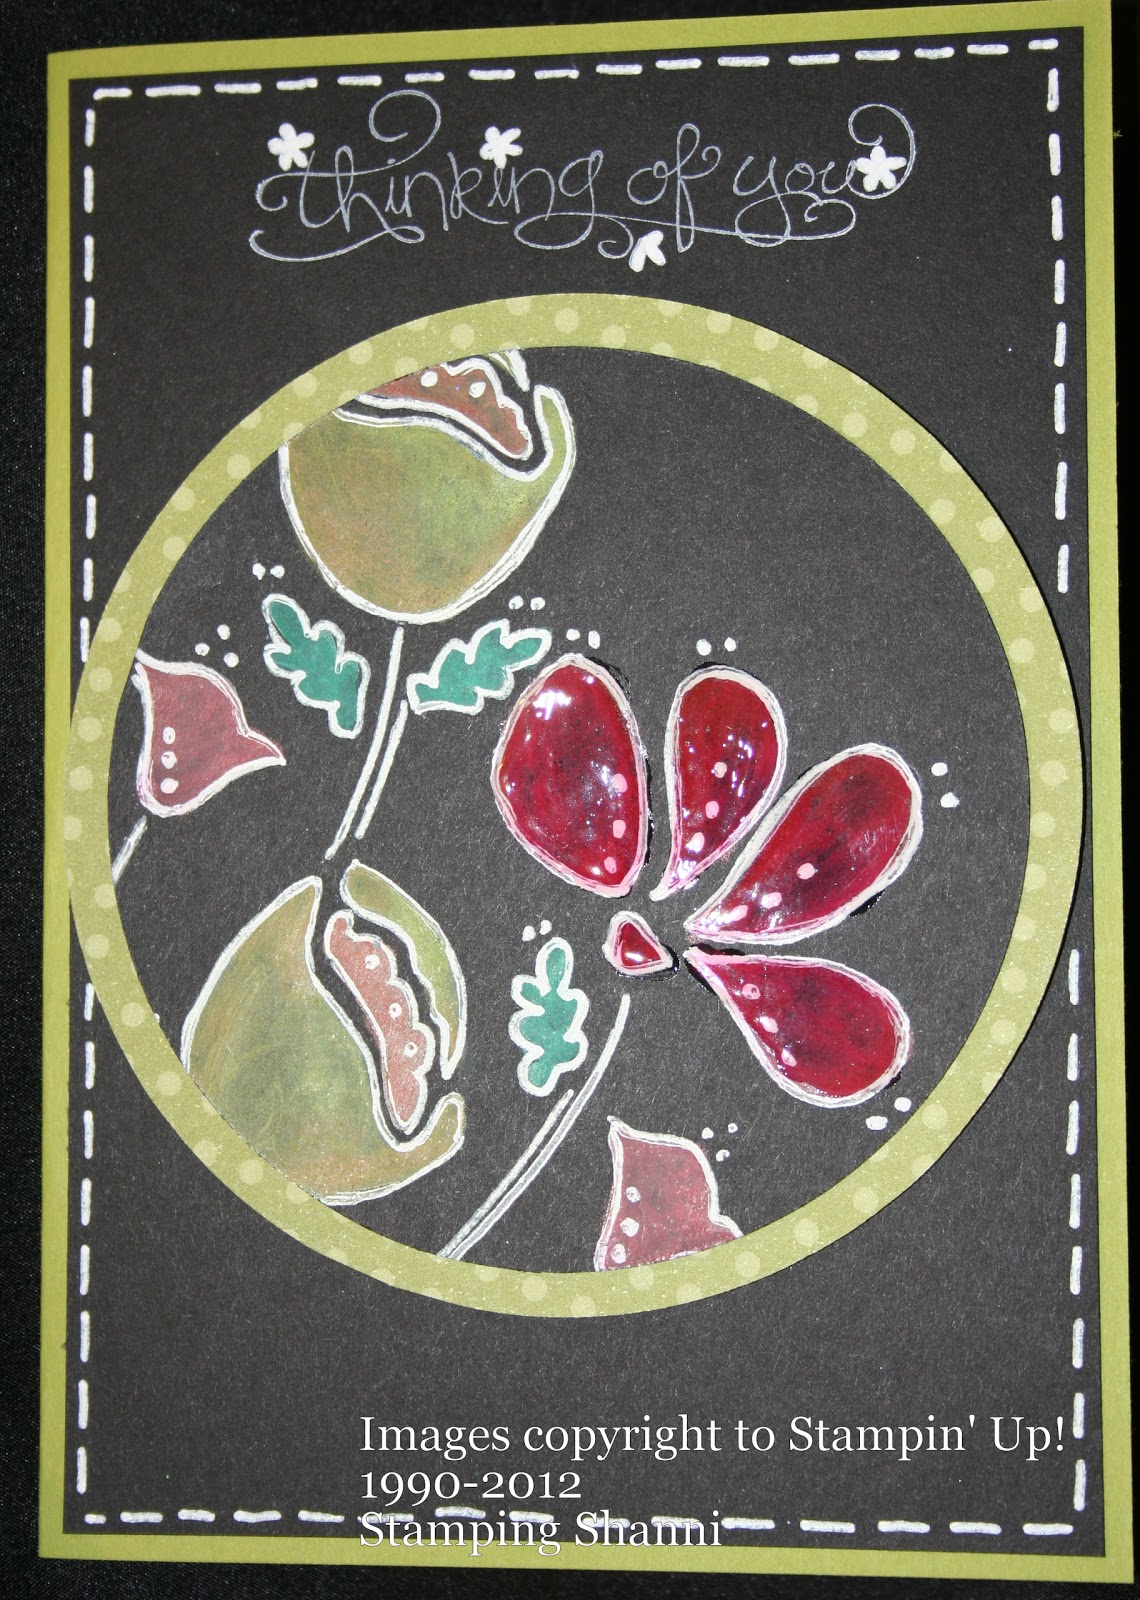
Awash with Flowers - PC - Black Board Stamping

The next technique that I tried was not as successful for me as I would have hoped.  People like Sandi McIver make this technique look simple but in reality it is hard to get the colours even.  In fact Mette, one of my stamping partners in crime, does amazing black board work. . . I have discovered that you also need a very steady hand to make the outline look like white chalk on a black board.  Hats off to black board artists all over the world!

So this first card is stamped first with craft white direct onto black card stock, I have then coloured over the white (once it was dry) with Stampin' Up! watercolour pencils. I then merged the colours with an aqua pen and outlined with a white gel pen.  I wasn't happy with how dull the red looked so I crystal effected it. . . not my best effort but I want people to see the projects warts and all!

This card is almost the same technique as the one above, but I didn't try to merge the watercolours here - I avoided the aqua painter and think that the colours are less patchy.

The third card using this technique was coloured with Stampin' Crayons instead of Watercolour Pencils and the colours are very vibrant. The greeting is from the Elementary Elegance set from Sale-a-Brations and complemented the fine lines of the Awash with Flowers outline stamps.

So I hope that you found some black boarding mojo from the above examples and that you forgive me because they are not the best examples in the world. 

Sharing is caring
Shanni

Awash with Flowers - PC - Outline Stamping & Daubed Colour

Sometimes I like to challenge myself to sit with a stamp set and make ten cards before I am allowed to move on to my next projects. . . This week's PC - personal challenge - was Stampin' Up! Awash with Flowers.  The set is a two step stampin' set and has plenty of images to choose from and although I have owned it for a year now it only gets used for random projects. 

I have come up with ten designs.  All cards are made in the A5/C6 size which means that they are all 10.5 cm x 14.8 cm.  I like to mount my image stamped cards and there is a fair bit of weight in them. This week I also chose to use colours outside my comfort zone.  I really have to push myself to use pink and have to remind myself that whilst it is not my favourite colour, it is a lot of other people's favourite colour. . .

So first challenge - stamping outline and colouring with a dauber - here are two different colour schemes for the same technique and are good examples on how vastly different projects can look by simply changing colour combinations.  I stamped the background randomly in black ink then daubed in the colours.


Colour scheme - Melon Mambo, Regal Rose, Calypso Coral and Pear Pizzazz.  Background colour - So Saffron.  Remember to always stamp off the inked dauber first so that you don't end up with blotchy colour spots.


These colours were easier for me to work with - sweet set Blushing Bride, Perfect Plum and River Rock.  I also added Pear Pizzazz for the leaves.  The background colour is River Rock as well.  I embossed the Blushing Bride card on the front with the Sizzix Big Shot Elegant Bouquet embossing folder to fit in with the spray of flowers theme.

Back soon with the next PC. . .black boarding.
Shanni

Tuesday, March 6, 2012

Simply Adorned No More. . .

Sad news today. . .Stampin' Up! are discontinuing the Simply Adorned line as of the end of this month.  If you love these little trinkets, charms and baubles then you need to get in and purchase them as soon as possible.  They will not be replenished if they are sold out before 31 March. 

The Simply Adorned trinkets can be found on page 7 of the Summer Mini. They are stunning in real life and are great little add ons for any special occasion card or scrap page.  They are also great jewellery accessories - jewellery grade nickle and hard wearing.

Check out one of my creations using the 1.6cm square charm.  Once again using the Fabulous Florets stamp set and words from the Sale-a-Brations Elementary Elegance set.


They are beautiful in their own right and quite versatile.

Hip love
Shanni

Monday, March 5, 2012

Canberra Here We Come. . .

87 days to go. . . until Canberra Convention and I have only just started looking at swaps for the big event.  I have started out simply as I would like to try and do 500.  Swapping is the best method of meeting people and getting new ideas.  I always try to do cards that are a bit unusual and this year will be no different.

My first swap for Convention 2012 is a black and white number (which really doesn't come up very well in the photo).  It is stamped in Staz On jet black and sprayed with Frost White Shimmer Paint spritzer and Dazzling Diamonds has been applied to the flower petals.  In real life it is quite pretty.


The second is equally simplistic - I just love the Fabulous Florets set from the Summer Mini and have almost burnt the rubber I have used it so much. I have masked and stamped the oleander out of this set and then popped a couple on dimensionals. The whole card was misted with Frost White Shimmer Paint spritzer to give it a pearl shimmer.


So I have three other styles in mind and will keep you updated on progress.

Back later
Shanni


Beau Chateau Designer Series Paper Projects

I have a regular group of stamping friends who meet at my place on Tuesday nights and of course our friendships have grown over the years to the point where we give each other gifts and look for any excuse to have a little party.  Christmas was postponed this year due to a bout of gastro so we ended up celebrating in February.

This was the gift that I made for the lovely Helen who is one of the sweetest people you could ever meet, she is also very talented stamper so I was a bit nervous about whether she would like her pressie.


For a closer look at the notebook


And also the post it note booklet


Gotta love the Champagne Mist Shimmer paint spritzer! 

Hip love
Shanni