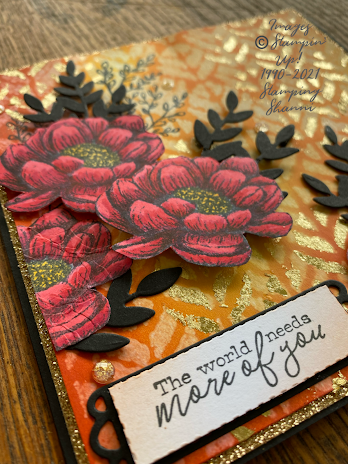
These are the sets, tools and materials I used:
Tasteful Touches
Free as a Bird
Basic Black Card stock
Whisper White Card stock
Rose Gold Metallic Specialty Paper
Tuxedo Black Memento Ink
Mango Melody Classic Stampin’ Ink Pad
Pumpkin Pie Classic Stampin’ Ink Pad
Cajun Craze Classic Stampin’ Ink Pad
Blending Brushes
Basic Patterns Decorative Masks
Spritzer
Gilded Leafing
Tombow Glue
Forever Flourishing Dies
Meadow Dies
Elegant Faceted Gems
Stampin’ Blends — Dark Cherry Cobbler, Light and Dark Poppy Parade, Dark Daffodil Delight,
Sentiments can be challenging — I chose this sentiment from the Free as a Bird set. It’s stamped in Memento Ink. I blended some pumpkin pie across the white to make it less stark and I mounted it on the basic black die shape from the Meadow Dies. I actually ran the stamped white card through the same die then cut along the faux stitched line so that it would sit perfectly in the shape.
Check out the rest of the design team’s projects — as always they are awesome!
Until next time,
Shanni xx
Tasteful Touches
Free as a Bird
Basic Black Card stock
Whisper White Card stock
Rose Gold Metallic Specialty Paper
Tuxedo Black Memento Ink
Mango Melody Classic Stampin’ Ink Pad
Pumpkin Pie Classic Stampin’ Ink Pad
Cajun Craze Classic Stampin’ Ink Pad
Blending Brushes
Basic Patterns Decorative Masks
Spritzer
Gilded Leafing
Tombow Glue
Forever Flourishing Dies
Meadow Dies
Elegant Faceted Gems
Stampin’ Blends — Dark Cherry Cobbler, Light and Dark Poppy Parade, Dark Daffodil Delight,
My base card is 6” x 6” Basic Black card lined on the inside with a square of Whisper White. I mounted the outside (the stamped side) with a square of Rose Gold Metallic Specialty Paper — I love a touch of bling!
The rose gold paper is mounted with a square of card which started as Whisper White; this is where the layering stencils came in . . .
I initially blended Mango Melody, Pumpkin Pie and Cajun Craze inks randomly on the card using the Blending Brushes. I made sure there were variations in colour depth and that all the colours merged so that there was no white shining through the ink. I then lay the stencil from the Basic Patterns Decorative Mask over the coloured card and spritzed it with water. You don’t need much water. I left it for say 10 seconds and dabbed off the excess with paper towel.
The water “lifts” some of the colour and makes the pattern appear lighter than the blended coloured background.
Once the stencilled pattern had dried, I lay the same stencil over the top of the pattern, but slightly below the spritzed areas; they are aligned but not identical. I then applied Tombow Glue using a baby wipe in the stencil voids and rubbed the Gilded Leafing over the glue. You brush off the excess.
This combination of stencilling creates the complex background that is both rich and gives the impression of texture because of the water marks. It’s so simple but dramatic. My sister gave me the idea for this in a team swap we held with the release of the new Annual Catalogue.
I stamped the leaf image from the Tasteful Touches set directly onto the background in Tuxedo Black Memento Ink. The flowers were stamped on a scrap of Whisper White card and I coloured them using Stampin’ Blends in the colours listed above. I fussy cut the flowers.
The black leaves were cut using the die from the Forever Flourishing Die set in Basic Black. I adhered them directly onto the background card. You will see that I snipped off a few stems to give the layout a more balanced appearance. The flowers were then adhered and mounted with dimensionals to add depth and interest.
No card is complete without some bling — I added the hold Elegant Faceted Gems. I felt the little speckled gold and translucent gems married the whole project together.
I hope you feel inspired to try layering stencils, they add a whole new dimension to projects and lend a mixed media feel to the card.
Until next time,
Shanni xx


Love all the details in your stunning card and glad you got it in the hope. Sending hugs Zx
ReplyDelete