Saturday, October 27, 2018

Totally Techniques - Embossing Crackle

Welcome back to another blog hop with the zany team from Totally Techniques. This month we are doing Cracked Glass technique. You may have just popped over from Kelly's blog - wasn't her project just incredible?

This is my project:
I followed Beate Johns' YouTube tutorial which was really simple step by step instructions.

I have made a square easel card with the following materials:

Base card - Cherry Cobbler Card Stock
First Mount (front and inside) is Early Espresso Card Stock
Second Mount Inside - Whisper White Card Stock
Second Mount Front Wood Textures 6"x 6" (daubered with Early Espresso Ink)

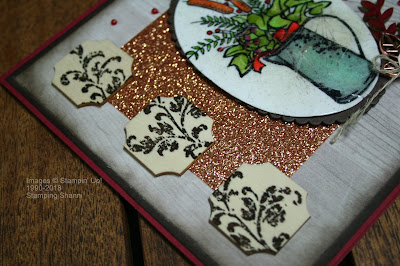
I have used glimmer paper features on the front and inside the card (which is mounted on a strip of Early Espresso Card Stock) - I chose the copper tone from Joyous Noel pack in the Holiday Cattie.
I used the stamps and sentiments from the Country Home stamp set, cut out the stamped image with the Layering Ovals Framelits and mounted it on two of the scalloped ovals from the same set in Early Espresso Card Stock.  All images have been stamped in Tuxedo Black Memento Ink. The timber elements are from Frames Elements - I stamped the darling label-style wooden elements with the filigree stamp from Timeless Textures in Early Espresso ink.
The leaves from the Frames Elements were coloured using the Dark Cherry Cobbler and Dark Old Olive Stampin' Blends. I stuck these together with the three leaf copper element from Leaves Trinkets, I added the linen thread tied in a bow and dimensionalised the embellishment. I coloured some Pearl Jewels with the Dark Cherry Cobbler Stampin' Blend to marry them in with the stamped image feature.
The actual cracked glass over the coloured stamped image was achieved by first stamping the whole oval with Versamark then heat embossing with Clear Stampin' Emboss Powder. I did about six (6) layers and simply dipped the oval back into the embossing powder before the project cooled down. I left it to dry for about 15 minutes then folded it in on itself - this cracked the gloss coating and gave the image a crazed cracked appearance.
To enhance the cracks slightly I sponges some Early Espresso ink across the front of the glass coating.
I coloured the stamped image with the following Stampin' Blends:

Green Foliage - Dark and Light Old Olive, Light Granny Apple Green
Berries - Dark Cherry Cobbler
Artichoke like Flower - Dark and Light Old Olive, Light Rich Razzleberry
Duck Flowers - Dark Pumpkin Pie, Light Soft Suede
Ribbon - Dark Cherry Cobbler, Dark and Light Poppy Parade
Jug - Dark and Light Smokey Slate Light Bermuda Bay
The inside of the card is very simple:
I hope you have found some inspiration.
Thanks so much for stopping by. Don't leave us just yet though as Barbara Meyer has the most beautiful project to share!
Until next month, stay glittery!
Shanni xx

Order of the October Blog Hop
Lynsay Mahon Canada
Nadine Weiner Germany
Kelly Acheson Unites States
Shannean Moncrieff Australia (that's me!)
Barbara Meyer Austria
Annette Elias The Netherlands


Sunday, October 21, 2018

Thinking Outside the Box - Easel Top Matchbox

Welcome back to another TOTB Designer Team blog hop. . . it's so great to have you back, I was busy last month so missed our hop but I saw how incredible the projects were and got really inspired. So this month we are doing the Easel Top Matchbox off the page project!
You may be starting the hop with me or perhaps you have checked out Barb Stewart's amazing project this month - I love Barb's creativity it's always stunning!

This is my project:
I followed the basic principles in Anya's YouTube tutorial which gives a quick overview but of course I made the card and the box as 6"x 6"square.  The matchbox base is made with 12"x 12" Whisper White Card, Lined with Basic Black and matted with Smokey Slate Card. The drawer is Basic Black card lined with Smokey Slate card.

The easel card is standard, made using Smokey Slate, lined with Basic Black card and mounted with Silver Foil Card. The inside is lined with Basic Black and Whisper White card.

The match box is very simple and straight forward. First I made the drawer to be certain that the whole project could actually be 6" square. The square of Basic Black Card is 19cm square of 71/2" square. I scored the card on each side 2.22cm or 1" from the edge. I cut into the four corners to the 90 degree point and trimmed the edge so that it could be folded without problems and adhered with tear and tape.
The cover or outside of the drawer was equally as easy.
Literally the two scored lines closest to the centre of the card are scored at the 15.3cm or 6" mark and then the next line out was 2.2cm or 1" from the first score lines. You will appreciate that the sides of the card don't meet because it will need to be a lot longer than 30.6cm or 12". So I cut a faux base which is simply a 15.3cm or 6" square piece of Whisper White Card.
I folded the base card and adhered the faux base using tear and tape to keep it sturdy. The lined the base with a square of Basic Black and a square of Smokey Slate. The two exposed edges were also lined with the same matting.
The front of the drawers was lined in the same way but of course only with the Smokey Slate. I also stamped the liners for the drawer front and back with the filigree stamp from Timeless Textures in Smokey Slate ink.

The easel card itself is decorated using stamps from Angels on Earth, Post Script and Dandelion Wishes.
I love the Pressed Tin Dynamic Textured Embossing Folder and think it will be the all time favourite from the Holiday catalogue this year. I embossed the Silver Foil Card and daubered it roughly with Whisper White Craft ink to give it an oxidised look.

The next layer up is a square of Whisper White that I heat embossed with the diamonds design from the Gallery Grunge set in Silver. I then daubered the edges of that card with Smokey Slate ink. Next layer is a rectangle of Gold Glimmer Paperand a strip of Silver Glimmer Paper running at right angles.

The largest square of card under the image is Soft Suede. I stamped the corner filigree from Angels on Earth stamped in Soft Suede; you will see that the edges are daubered in Smokey Slate but it looks a bit like zinc - you can get this effect by putting Whisper White Craft ink on your dauber first then Smokey Slate ink next - it makes the colour more opaque. Layered on top of this is a piece of Chicken Wire Elements.
Next Smokey Slate rectangle stamped with the Post Script background stamp in Tuxedo Black Memento Ink, edges daubered in Smokey Slate. I punched out some leaves in Vellum card stock using the Leaf Punch and poked them under the corners.

The angel is stamped in Tuxedo Black Memento Ink. I stamped it twice so I could cut out the wings and dimensionalise them. I coloured the wings slightly using Smokey Slate ink and Wink of Stella and then I used Wink of Stella and Gold embossing powder so to heat emboss the wings - I haven't heard of anyone doing that before me so its a new technique I think. I also coloured the angels hair and embossed it the same ways as the wings.

I coloured the gown in Cherry Cobbler ink and Wink of Stella and added a touch of Blushing Bride to the cheeks and collar bones using an aqua painter.
The timber element is from Frames Elements. I lay it on the Versamark ink pad then heat embossed it with Gold. The pearl jewels are to add a touch of luxe and contrast for the gold.
The easel card stays open using the word celebrate from the Celebrate You Thinlits in Silver Glimmer Paper. It's a neat way to keep the card opened.
You can see how well the wings are dimensionalised and how the project has a heap of layers. I have made it for my daughter who turns 14 in a couple of weeks time and I plan to put some Fenty makeup in the drawer along with some makeup brushes.
The knob on the front of the drawer is a silver rose from the Share What You Love Embellishment kit to marry in with all of the silver and also the antique feel of the project.
I hope that you have been inspired by all the incredible projects this month and that you give this unusual box card a try. Don't leave us just yet though as we have an amazing project from Yoshiko- she is so incredibly talented!
Thanks for popping by!
Shanni xx
October's Blog Hop Participants:

1. Shannean Moncrieff (Australia) 
2. Yoshiko Endo (Japan) 
3. Carrie Bates ( UK) 
4. Annette Elias (Netherlands) 
5. Dena Rekow (USA) 
6. Beate Wacker (Austria) 
7. Aude Barbara (France) 
8. Barb Stewart (Canada)

Thursday, October 11, 2018

Fancy Folds - Sliding Pop Up Cards

Welcome back to another month of Fancy Folds blog hopping. This month the design team are tackling Sliding Pop Up Cards.

How incredible is Satomi's beautiful project?! I love how everyone has used a different stamp set and take on this project.


This is my card:
I followed Jennifer McGuire's YouTube tutorial which was really simple and instead of using framelites I cut the requisite shape using our Stamping' Paper Trimmer. It is a standard C6 card and I cut the void 1.5cm or 1/2" from the card edge and scored the lines at the top where the card was connected, at the half way mark and then about .5cm from the bottom.
You can see the rectangular void clearly in the photo above. I used Whisper White card stock for all of the elements because I was conscious that it is more forgiving than coloured card stock. I used dimensional adhesive strips. for the sliding feature. This is what the card looks like open when the sliding panel is pulled to capacity.

I framed the base of the card which is a proper card with the new rose gold Glimmer Paper from the Joyous Noel pack in the mini catalogue. I then mounted that on a rectangle of Blackberry Bliss card. I used the Happy Birthday Thinlits with Blackberry Bliss for the sentiment which is adhered to the slider element.
Plenty of room to write my message on the inside of the card. given how busy the outside of the card was I didn't stamp the insides.
I wanted the card to look like a vase of flowers. I adore the First Frost stamp set in the Holiday catalogue and every element of the stamped images is from this set. The small and large flowers were stamped in Berry Burst on Whisper White, The long garland leaves were stamped in Old Olive and the flowering leaves were stamped in Mossy Meadow. The thistles were stamped randomly using the rock and roll technique in Mossy Meadow and Blackberry Bliss.

All the images were cut out using the Frosted Bouquet Framelits. I also cut extra leaves and berry branches (the stalks with the round berries)
Here the card is partially open. I arranged the flowers and adhered them to the floral cut-out from the Foliage Frame Framelits set.. Some of the flowers are dimensionalised. I kind of placed the solid coloured leaves throughout the arrangement to break up the colour and give the bouquet some depth. The vase is cut out using the additional shape froth Foliage Frames set in the rose gold Glimmer Paper.
You can see the different dimensions here - I wanted the arrangement to look like it was popping out of the vase and to stand up when the slider was activated.
This side view shows how the flowers and leaves are interspersed.
I am pretty happy with how the vase all sits and the arrangement is balanced.
You can see that I hoped some of the flowers with a touch of Wink of Stella - I loved how tis altered the colour of the flowers ever so slightly and gave the bouquet even more depth and dimension.

I hope you have found some inspiration from our blog hop and that you give this card a go. It's really easy and the effect is quite dramatic.
Don't leave us just yet! Nadine Schweda has done the most incredible project. It's exciting to have Nadine on board as a new Design Team member.
Until next month, stay glittery!
Cheers

Shanni xx


October Blog Hop Order

1.Gina Connor(UK) 
2.Satomi Wellard (Japan) 
3.Shannean Moncrieff(Australia) that's me!
4. Nadine Schweda(Germany) 
5.Aude Barbara(France) 
6.Miranda Mols(Netherlands) 
7. Astrid Hofman(Austria)