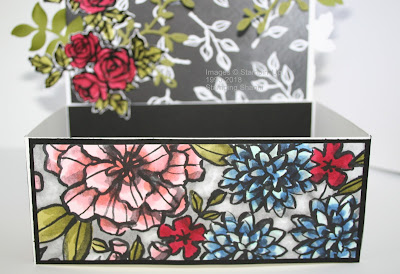
This was a tough project in that we no longer carry the milk carton framelits so whilst that template might be available else where I didn't want to make a carrier box that wasn't practical. I have opted for a tool caddy; something that I can use on my craft table with my supplies for a particular project or perhaps take to a class with the card kit tools and other essentials in the storage trays. . .
Here is my project:
These are materials and tools that I used:
Petal Palette Stamp Set
Petals & More Thinlit Dies
Eclectic Layers Thinlits Dies
Petal Passion Designer Series Paper
Cherry Cobbler Classic Stamp Pad
Old Olive Classic Stamp Pad
Aqua painter
Light and Dark Cherry Cobbler Blends
Light and Dark Pink Pirouette Stampin' Blends
Light Pumpkin Pie Stampin' Blends
Light and Dark Pool Party Stampin' Blends
Light and Dark Old Olive Stampin' Blends
Light and Dark Smokey Slate Stampin' Blends
Whisper White Thick card stock
Basic Black card stock
Old Olive card stock
Memento Tuxedo Black Ink
Clear Stampin' Emboss Powder
Heat Tool
Here are the instructions:
1. Trim two pieces of Whisper White Thick A4 card stock to measure 26.8cm x 21cm (10 9/16" x 85/16") and score 6cm (23/8") from each of the four sides. Cut on the horizontal score lines on each landscape end as per the shaded area on the photo below.
2. This is what each of these pages will look like:
4. Adhere the two pieces together - they create a sturdy back board and handle. This piece is then adhered between the two boxes bases to form a central feature. I mounted Petal Passion DSP on each side before adhering the base boxes.
5. Cut some contrasting DSP to highlight the base panels. On my project I chose the Petal Passion DSP. You will see that I cut four larger lengths and four shorter pieces. I didn't focus on the fact that I was going to stick two sides of the boxes together. I coloured these with the Stampin' Blends.
6. To reinforce the box base I stuck Basic Black card stock on all four sides. I cut the black card stock just a small amount smaller than the Whisper White card base. I also reinforced the central panel that adhered to the back board handle area.
7. Finally I adhered the coloured DSP to the black back ground.
I wanted to have a small gap between the panels on the sides to break up the pattern and the colours.
8. Finally I decorated the back panel of the caddie/carrier box. I stamped the rose stamp out of the Petal Palette set in Memento Ink and embossed it with Clear Stampin' Emboss Powder six times on Whisper White cardstock. I coloured the images using an aqua painter and Cherry Cobbler and Old Olive ink. I then fussy cut each image out.
To create the images on the left hand side I simply cut one of the roses out of the full stamped image. I used the remaining stamped images on the right hand corner. The roses are mounted on top of leaves cut using the Petals & More Thinlit Dies and the Eclectic Layer Thinlits. I daubered the edges of the larger leaves for contrast.
Please don't leave us yet because you are going to be blown away by the incredible projects this month. Next up is my good friend Tanja Kolar - you are going to love her project!
Until next time, squeeze in some craft!
Shanni xx
Order of the April Blog Hop
Shannean Moncrieff Australia - that's me!
Tanja Kolar Germany
Yoshiko Endo Japan
Zoe Tant United Kingdom
Annette Elias Netherlands
Sharlene Meyer New Zealand
Beate Wacker Austria


Fab holder and elegantly decorated as one is accustomed to see from you. Gorgeous..... Zoe x
ReplyDeleteThis is a great way to use this carrier for different things. That´s great idea and I ´ve to safe it ( in my mind)to craft it for my next big team event. They will look amazing on all the tables. Thanks for sharing, all your passion and just you´re part of our amazing group.
ReplyDeleteHugs from sunny germany your sister in mind Tanja
This is gorgeous and your colouring skills are amazing! I love this!
ReplyDeleteGorgeous Shannean and a clever use of the caddy design! Love the colouring.
ReplyDelete