

Welcome back to another Thinking Outside the Box Design Team blog hop. Happy January! I hope that you have been finding time to craft. I am loving so many suites in the Occasions Mini that it's hard to do real things around the home. . . This month we are making Explosions Boxes!

It may be that you have joined us from one of the other design team members, perhaps even, Barb Stewart's amazing blog. I love the different takes and designs we have on the same project.
This is my creation this month:

I thought that most people would lean towards a cube project because I enjoy making them so I decided to change it up just a little bit. . .
These are the tools and materials I have used:
Perennial Birthday Stamp Set
Amazing You Stamp Set
Sweet Soiree Specialty Designer Series Paper
Old Olive Card Stock
Marina Mist Card Stock
Daffodil Delight Card Stock
Whisper White Card Stock
Silver Glimmer Paper
Smokey Slate Ink Pad
Old Olive Ink Pad
Daffodil Delight Ink Pad
Aqua Painter
Layering Circles Framelits
Celebrate You Thinlits
Rhinestone Jewels
I started with a circle cut out to build a hexagon shape that would form the centre of my explosion box. I found the centre of the circle then divided it into 6 even segments using a rule.protractor and pencil.


This is roughly how it looked before I trimmed it down. Each side on the hexagon is 111/16" or 4.3cm.

I used the hexagon as the centre of the design and measured the sides of the box from the base outward. I was mindful that I needed to keep the box at a size that could be cut from an A4 piece of card.

This is the template for the base of the explosion box. Every other part fits inside this shape. The sides coming off the central hexagon are 111/16" x 21/2" or 4.3cm x 6.4cm. It's best to design a box with even numbered sides so that you can draw through the angles of the hexagons to match up the sides.

Keep the hexagon template, I actually stamped on this and made it the feature on the top of the explosion box.

See how the hexagon forms the centre of the design?

This is the template for the middle layer of the of the explosion box. The hexagon is the same size. The sides are 111/16"x 23/16" or 4.3cm x 5.5cm. You can make these any size in reality provided they are slightly smaller than the base sides.

I used Marina Mist Card stock for the middle layer. The hexagon again gives you context.

This is the centre layer of the explosion box. Again the hexagon is the same size and the sides are slightly shorter. the side measurements are each 111/16" x 2" or 4.3cm x 5cm. I wanted to have a lotus effect in the centre of the explosion box.

The centre of the explosion box is cut from Daffodil Delight. I chose these three colours to match the paper that I selected from the Sweet Soiree Specialty Designer Series Paper. I wanted the Old Olive with embossed silver lines as the feature paper and the other two colours appear on its reverse.

This is the lid and I made it using a slightly larger hexagon as my central feature. The sides in this instance are designed to be folded inwards the measurements are 13/4" x 2" or 4.5cm x 5.5cm. You will see that I have also incorporated tabs for adhering the lid together, the dimensions for these three sides are slightly wider to accommodate the tabs - 21/2" x 2" or 6.5cm x 5.5cm.

I suggest folding the side-tabs in before folding each of the sides of the lid towards the centre.

The lid virtually makes itself.

To ensure that you are on track compare how the box folds together the folds on the side tabs should all marry up and the lip of the lid is formed. I adhered my lid with Tear and Tape and Glue Dots.

Cutting out the base of the explosion box - this is what it looks like.

The middle layer of the explosion box.

The centre layer of the explosions box.
I suggest layering the feature card, paper and stamps before constructing the box. Once it is adhered together it will be quite awkward to stamp or glue some areas. By adhering everything together, it creates a really sturdy and substantial item.

This is the three layers positioned inside each other to give you a visual on what to expect.

I have used the Sweet Soiree Specialty Designer Series Papers as the feature on two of the layers (the white background with the dots is the reverse of the Old Olive and Silver paper). I stamped the flower stamp from Perennial Birthday set in Daffodil Delight on the same coloured centre layer.
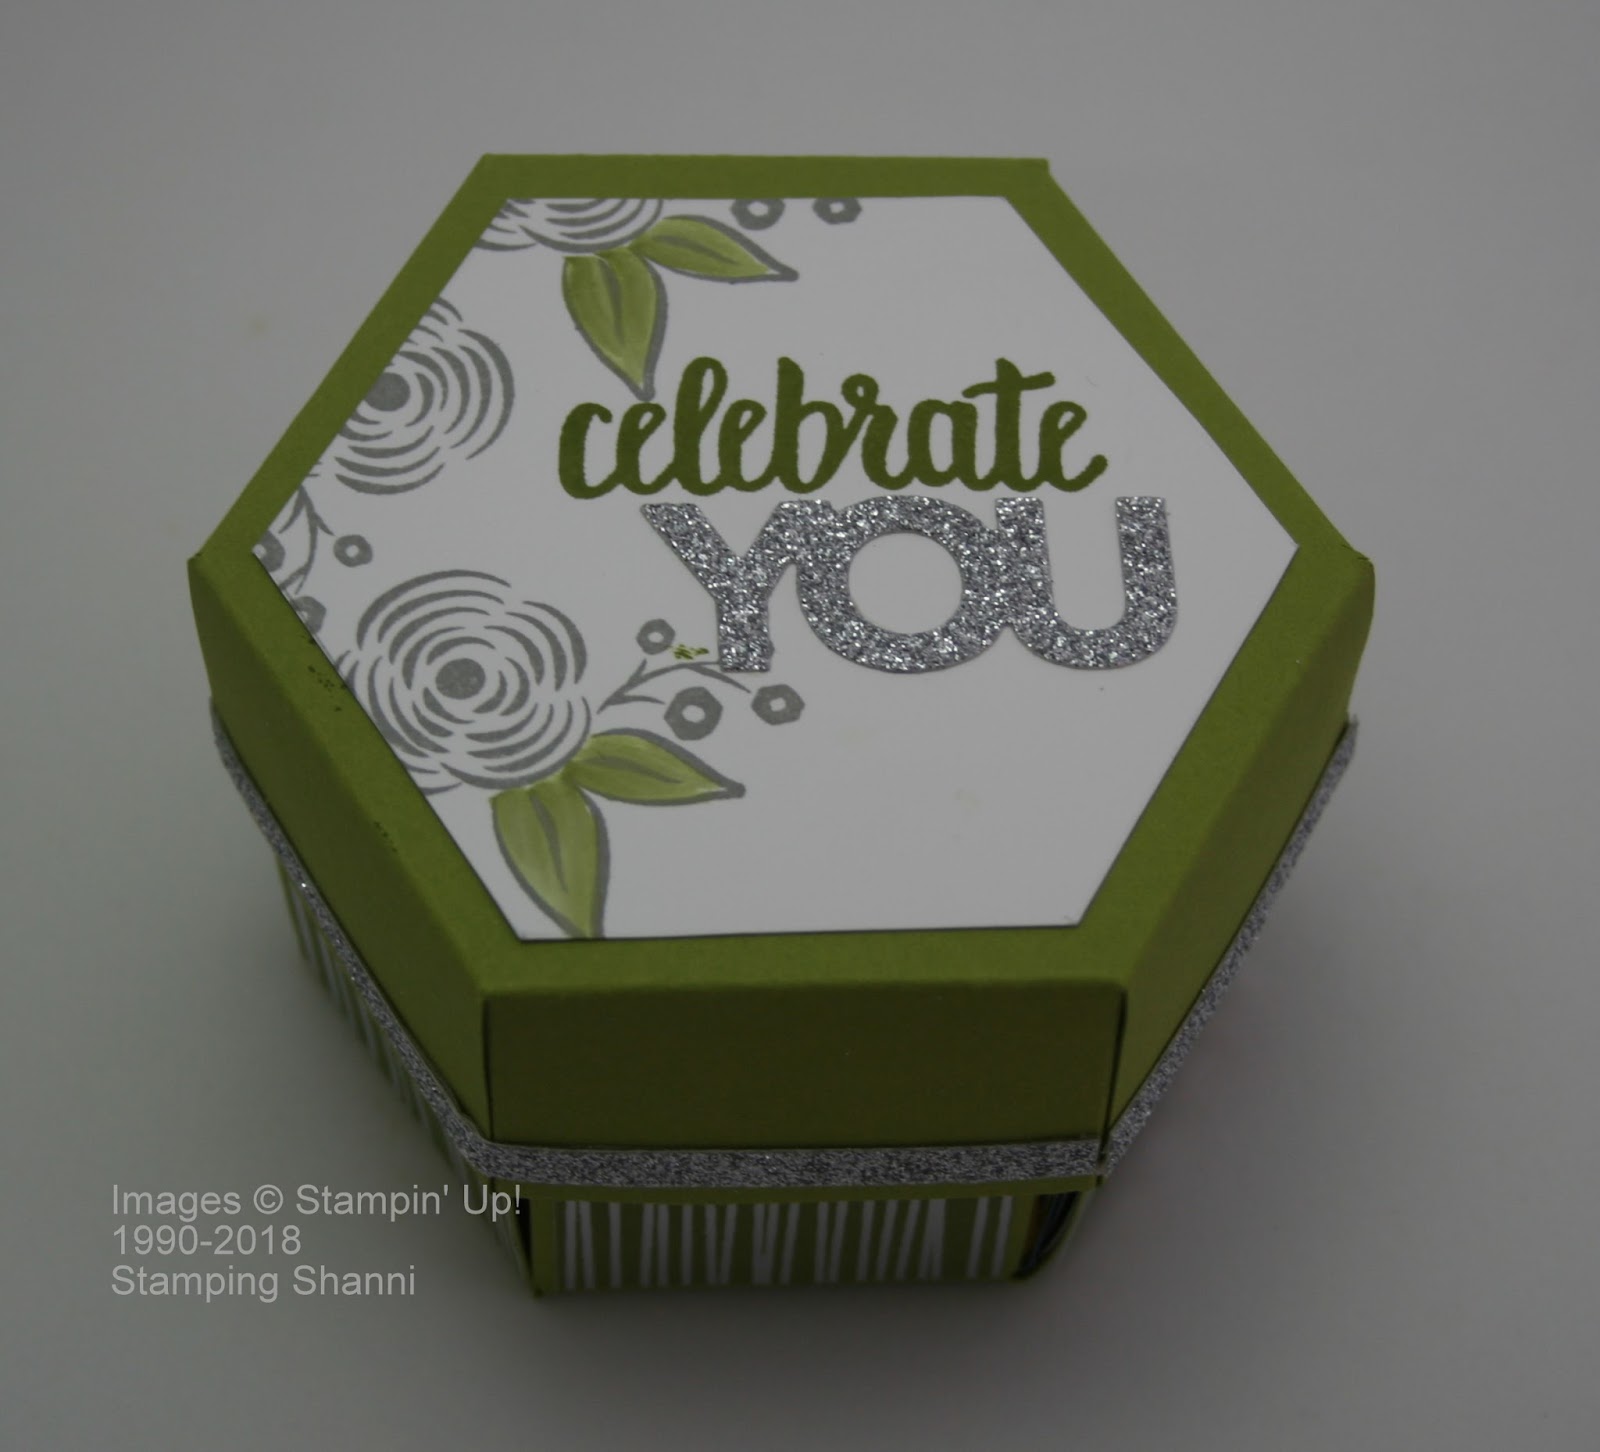
As mentioned above I used the hexagon template as my stamping base on the lid. I have again stamped the flower from Perennial Birthday in Smokey Slate and coloured just the leaves in Old Olive. The sentiment "celebrate" comes from the Sale-a-Bration set Amazing You and the Silver Glimmer Paper "you" comes from the Sale-a-Bration Celebrate You Thinlit Dies

I could imagine making little pockets and embellishments for the inside of an explosion box like this but I wanted to keep it simple on this occasion and allow the design to speak for itself. The Silver Glimmer Paper marries in nicely with the embossed silver feature on the DSP.

Because the inside of the box is so "busy" I wanted the outside to be clean and clear.

I lined each of the "sides" of the centre layer of the explosion box with Whisper White and stamped them in a random fashion similar to how I stamped the lid liner. I added Daffodil Delight to the centre of the small flowers with an aqua painter. The hexagon centre is 1/16" or 2mm smaller around the perimeter than the template used for the front of the card. The Rhinestone Jewels add a touch of bling!

The Marina Mist middle layer is stamped randomly with the flower stamp from Perennial Birthday in Marina Mist ink. The reverse side of this layer has the Sweet Soiree Specialty DSP layer.

One of the reasons I chose the Sweet Soiree Specialty DSP is because it is so sturdy. The paper is thicker than most DSPs and reinforces the explosion box sides beautifully. I especially wanted the bottom of the box to be strong (given its the outside which will face the most wear and tear), so it ias the Old Olive with Silver emboss feature on both sides (inside and outside the box).

I think it looks a little like an exotic lotus flower! That was my goal. . . The senitment on the inside of the box are from the Sale-a-Bration set Amazing You - the "you" and "are simply" are stamped in Smokey Slate and the "amazing" is stamped in Old Olive. I love that with this set you can create any combination of sayings.

So the box from the exterior is pretty unassuming and that's part of the joy of making hand made cards and gifts - it's only once people have opened them that the really cute and fun part begins!

I hope you are feeling inspired to try this box. It is very simple and as you become more competent you can increase the complexity. Good luck!
Don't leave us yet though because you are going to die when you see how incredible Tanja Kolar's project this month!


Until next month, keep crafting!
Shanni xx
Blog Order Hop for January

Shannean Moncrieff Australia (that's me!)
Tanja Kolar Germany
Yoshiko Endo Japan
Annette Elias Netherlands
Dena Rekow United States
Beate Wacker Austria
Aude Barbara France
Barb Stewart Canada
Yoshiko Endo Japan
Annette Elias Netherlands
Dena Rekow United States
Beate Wacker Austria
Aude Barbara France
Barb Stewart Canada
Oh such a lovely box! I love the shape and the colors and your directions are so clear!
ReplyDeleteEverytime, when I think: This lady couldn´t suprise me more.. You set one more on top! Are you crazy??? This is shittyfuck awesome !
ReplyDeleteSending you greetings from cloudy germany.
Enjoy your summer.
Hugs Tanja
Beautiful work as ever Shannean. I love your 'different' version of the exploding box. It's delightful. Zoe x
ReplyDeleteSuch a cool Box! Thought First you ´ ve User the framelits! Thank you for this Idee and the Tutorial!
ReplyDeleteBeate
What a clever idea!Thank you for sharing!
ReplyDelete