Saturday, November 25, 2017

Totally Techniques - Stampin' Blends

Welcome back to another Totally Techniques DT Blog Hop - this month our feature is Stampin'Blends. I don't know about you crafters but there is nothing more relaxing than colouring in. . . you are able to tune out completely and just relax, so this technique was a blessing to me this month as we are so busy with end of school year, break up parties and concerts, graduations and all things festively oriented. . .

I hope you enjoyed Marine's gorgeous creation - her projects are always so beautiful!

Here is my project this month:
I love the Birthday Blooms set because it's so easy to stamp and colour. I have used the following Stampin' Blends:

Dark Pink Pirouette
Light Pink Pirouette
Light rich Razzleberry
Dark Old Olive
Light Old Olive
Light Smokey Slate

It's a square easel card! Base card is Thick Whisper White card stock mounted on a square of Blushing Bride. On top of the Whisper White I have mounted a square of Blushing Bride which is marginally larger than the square of Dazzling Diamonds Glimmer Paper which forms my canvas.
I stamped the flowers from Birthday Blooms on Shimmery White Card Stock in Tuxedo Black Memento ink and coloured the flowers. I like to start with the darker shadowed areas first and then come in with the lighter colour and if need be the colour remover although in this instance I didn't need to. I then fussy cut the flowers as I wanted the card to be a bit celebratory and the added bling of the glitter pops the stamped and coloured images nicely.
I adhered a Delicate White Doily to the glimmer paper and then added the stamped coloured flowers to the top of the doily. I went around the bottom of the adhered images with the Light Smokey Slate Stampin' Blend to give an illusion of shadows.  I drew the Dark Pink Pirouette directly on the glimmer paper using a ruler and the pen. I added a touch of smokey slate to the line as well to marry in with the shadowing beneath the flowers.
I highlighted the stamens of the flowers in Light Rich Razzleberry. I added the Silver Mini Tinsel Trim to marry in with the Rhinestone Jewels and glitter of the glimmer paper.
The easel device of the card is the line of Rhinestone Jewels inside the card. The sentiment is the Stylized Birthday stamp. I stamped in Tuxedo Black Memento Ink on Whisper White card and fussy cut it out. It is adhered with Tombo Multipurpose Glue. I also added Clear Wink of Stella to the voids in the letters in the sentiment in the hope of getting it to blend a little better but I don't think I was successful.
I hope you have taken some inspiration from my card. I love the fact that you can draw on and colour glimmer paper with the Stampin' Blends to work them in with the project.

Don't leave us just yet, we have a few more blogs to go, starting with the amazingly talented Zoe Tant, from the UK! Check out Zoe's beautiful project this month!

See you next time!
Shanni xx

Order of November Blog Hop
Patrice Halliday-Larsen (New Zealand)
Nadine Weiner (Germany)
Marine Wiplier (France)
Shannean Moncrieff (Australia) that's me!
Zoe Tant (United Kingdom)
Barbara Meyer (Austria)
 Annette Elias (Netherlands) and brand new!

Sunday, November 19, 2017

Thinking Outside the Box - Simple Advent Calendars

Welcome back to another Thinking Outside the Box Blog Hop! This month we are sharing Simple or Quick Advent Calendars. Enjoy!
The idea behind the Quick and Simple Advent Calendars is that you make just four of them to represent the 4 Sundays of Christmas. I hope you find some inspiration and fun with our creations. You may have just popped by from Barb's amazing blog, if so stick around we have heaps to share. This is my creation:
My photo is not in black and white - these are the colours I have chosen for my project this month. I have made four non-traditional boxes!
So the boxes are made with 12" x 12" Basic Black cardstock. I have stamped in Archival Black Ink and Smokey Slate (in the instances when I have used grey).

Here are the instructions which I have kept simple:

1.  Each project uses a piece of card stock 6" x 12"
I scored the piece landscape at 4" (10.2 cm) and then turned the card stock to portrait and scored at 27/8" (7.4cm) from the left hand side of the card. I folded the scored line up and simply scored three more times at the same measurement.

You leave the little left over bit on the right hand end to adhere the box together.

2.  I snipped out the triangle shapes so that the base of the card would be easier to fold and adhere.
The photo is flipped as it is the "right side" of the project.

3. Next step was cutting the windows. Ideally it would be great if we had some rectangle framelits so that we could simply run a box template like this through the big shot. Instead I used my Paper Trimmer to cut out 4 voids.

I simply cut in from each scoreline 3/8" (1cm). I left a consistent border at the top of the box of just shy of 5/8" (1.5cm) and at the bottom 3/16" (0.5cm).

4. To decorate the voids I cut Vellum Card to fit the space. In total I cut 16 pieces 21/2" x 31/2" (6.4cm x 9cm). I stamped these before I adhered them on the inside of the box over the void.
5. To keep the advent calendar interesting I stamped off to the side on some panels and added contrasting detail in Basic Black card stock.
6. I adhered the Vellum Card using Tombow Multi Purpose Glue. I used the same glue for the cut outs when adhering them to the front of the boxes.
7. Where necessary I trimmed excess overlaps. This is an image of the reverse side of the box before construction. You can see that i have placed tape on the bottom panels.
This is the right side of the project. Note the placement of tape for construction. I also made tags to add to the boxes and used Shimmer Ribbon in Basic Black to add a bite of luxe to the boxes.

The four boxes are decorated differently. I have chosen non-traditional images and framelits but it would look very effective with traditional religious images and framelits. So here are the details of each of the boxes.

The Snowman Box


Snowman is from Seasonal Chums

Materials & Tools

Christmas Lamppost Thinlit Dies

Seasonal Chums
Christmas Happiness
Ready for Christmas
Hearts Come Home

Basic Black Card Stock
Silver Glimmer Paper

Archival Black Ink
Smokey Slate Ink

Rhinestone Jewels
The christmas tree is from Ready for Christmas
The house and sleigh is from Hearts Come Home
The background tree frond is from Christmas Happiness
All of the tags have been made in the same way the only difference is the contrasting stamp on the front.

So the back is Smokey Slate punched with a 21/2" Circle Punch. Silver Metallic Thread has been toused as the next layer and then on top of that is Silver Glimmer Paper punched with the Everyday Label Punch.

The top circle is 2" Whisper White. The rings from Cheers to the Year has been heat embossed in Silver, the greeting from the same set is stamped in Black Archival Ink and the leaves in Smokey Slate.

The Little Drummer Boy Box


The little drummer boy and the background foliage are from the Musical Season stamp set

Materials & Tools

Musical Instruments Framelits Dies

Musical Season

Silver Foil Paper
Basic Black Card Stock

Basic Black Shimmer Ribbon

Black Archival Ink
The French horn is cut using the Musical Instruments Framelits and Silver Foil card
The little drummer Boy is used twice on this box but positioned ever so slightly differently.
 The treble clef has been cut out from Silver Foil.
 This is how the tag sits over the box.
The tag is exactly like the earlier one above, the only difference being the leaf image from Musical Season stamp set, stamped in Smokey Slate.

The Lantern Box
I love the simplicity of the Lantern Builder Framelit Dies, the candle image is from the matching stamp set, Seasonal Lantern

Materials & Tools

Lantern Builder Framelit Dies
Chandelier Thinlit Dies
Detailed Gate Thinlit Die

Seasonal Lanterns
Season to Sparkle

Black Archival Ink
Smokey Slate Ink

Rhinestone Jewels
The beading add on to the chandelier is from the Season to Sparkle stamp set, stamped in Black Archival ink and decorated with rhinestones.
 I added a rhinestone as the flame on the candle, stamped in smokey slate.
 With the tag across the same panel.
The Detailed Gate is busy enough without the need to add a stamped image. I simply added rhinestones to pop the detail.
The tag is the same as the rest, the leaves are from Seasonal Lantern.

The Snow Box
Very little stamping on this box. The snowflake is from Trim Your Stockings Thinlits and the scroll from Swirly Snowflakes Thinlit Dies.

Materials & Tools

Trim Your Stocking Thinlit Dies
Swirly Snowflakes Thinlit Dies

Stare of Light
Cheers to the Year

Silver Stampin' Emboss Powder
Versamark

Silver Glimmer Paper

Rhinestone Jewels

Black Archival Ink
Smokey SlateInk
 The star dust from Star of Light Stamp set is heat embossed in Silver.
I liked the scroll and the snowflake without any stamping but the rhinestones add a bit of bling!
 Star dust and a snowflake off the edge.
 With the tag in situ.
Tag has the snowflake from Cheers to the Year as the contrast.

So this is what they look like when they are set up with candles in them:
Thanks for stopping by and I hope that you have enjoyed the projects.  I have decided that I will use mine as table decorations on Christmas Eve.

Don't leave us just yet. Check out Tanja's amazing creation!


Stay sparkly!
Shanni xx

Order of November Blog Hop
1. Shannean Moncrieff Australia
2. Tanja Kolar Germany 
3. Yoshiko Endo Japan
4.Zoe Tant United Kingdom 
5. Annette Elias Netherlands
6. Dena Plummer USA 
7. Sharlene Meyer New Zealand
8. Beate Wacker Austria
9. Aude Barbara France
10. Barb Stewart Canada

Thursday, November 9, 2017

Fancy Folds - Double Dutch Fold

Another month and another hop - such a busy time of the year and a lot of us are off to OnStage. I am heading to Auckland to visit with all my favourite people across the ditch. Hope the you have enjoyed the hop so far. . . Satomi's cards are always so beautiful!

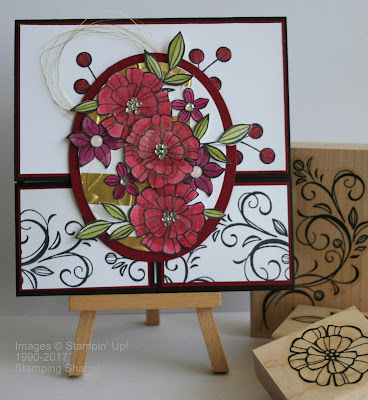
Here is my card:
I followed the YouTube video by Beate Johns from Splitcoast Stampers ~ her directions are always so easy to follow.

I made a square card and tried to keep it simple. Base card is Basic Black mounted with Cherry Cobbler and of course Whisper White. The stamp set is Falling Flowers and I have to admit to using this stamp set because I had noticed a lot of cards on social media this week using this set (thanks Patty Bennett).
I did all of the stamping in Tuxedo Black Memento Ink and have coloured the flowers using an aqua painter and the following colours: Cherry Cobbler, Rich Razzleberry, Berry Blast and Old Olive.
Rather than using the framelits for this set I fussy cut the flowers and leaves as I wanted to do away with the little white edge. I also used the scrolled or filigree stamp from the same set for the gate fold part at the bottom of the card.
You all know that I love texture so I used a section of the gold and white Striped Treat Bags behind the flowers to add a bit of glimmer. I embossed this section of paper bag with the Layered Leaves 3D Dynamic Textured Embossing Folder.
To tie in the gold I also added some Gold Metallic Thread. The tousing is in place of DSP because I thought that a background paper was too busy but wanted to blend the whole card layout. I also used Clear Wink of Stella on the large flowers which are coloured with Cherry Cobbler - this changes the colour ever so slightly. Rhinestone Jewels for the centres of the large and small flowers then Glitter Enamel Dots in the light pink tone.
I hope you can see the dimension in the flower element. I used the Layering Ovals thinlits and wanted a greater contrast between the white and red areas so I jumped a size.
The inside of the card is lined with Cherry Cobbler and Whisper White. I didn't decorate it simply because I thought it might not marry in smoothly if the bottom part of the gate opened by accident. The weight of the ovals holds the whole card closed.
Hope you got some inspiration from my design. Don't leave us just yet because the incredible Tanja Kolar has a beautiful project to share!
Until next time, stay happy!
Shanni xx

Order of November Blog Hop
1. Patrice Halliday-Larsen (New Zealand) 
2. Gina Connor (United Kingdom) 
3. Satomi Wellard (Japan)
4. Shannean Moncrieff (Australia) 
5. Tanja Kolar (Germany) 
6. Aude Barbara (France) 
7. Miranda Mols (Netherlands) 
8. Astrid Hofmann (Austria) 
9. France Martin (United States)