Sunday, November 25, 2012

Handmade Banner

Our brief from Stampin' Up! was to come up with projects that used our selected products or techniques and challenged our boundaries.  I have been making roses for a long time now and learned from a tutorial from fellow Stampin' Up! demonstrator Carolyn Rakowski from Tasmania.  Her link is on the side of my blog. . . she is a legend and loves paper tolling in all its forms.

So I had been asked to do flowers and flourishes as my presentation during my allotted time slot.  We were to make a variety of projects to appeal to the attendees including cards, scrapping pages and off the page projects if we felt inclined. . .

Here is one of my projects:
The base of the project is grunge board (which I collect from packaging such as the Glimmer Card stock and Simply Scrappin' Kits).  I cut the card and the First Edition Specialty DSP with the Originals Two Tags die.  Distressed the edges and daubed them all with soft suede and crumb cake.
All of the tags are linked together using the divine Crumb Cake Scalloped Edged Tulle from the Holiday Catalogue which will be finishing at the end of January.  This is lush, soft and adds texture, colour and interest to all projects ~ love it!
I selected the Regals Family of coloured card stock and ink to use with the projects so the primary colours are Cherry Cobbler, Riding Hood Red, More Mustard and Not Quite Navy.  I have also added the usual neutral shades of Early Espresso, Soft Suede and Crumb Cake where needed.
The flower is made using the Fancy Flower Punch.  The leaves are stamped using French Foliage stamps and the rock and roll technique in More Mustard and Riding Hood Red and Soft Suede and Riding Hood Red.  I fussy cut them out and distressed them a little.  The contrasting little leaves are from the Bird Builder Punch in the Champagne Glimmer Paper.  The corrugated card in the background is from the delivery carton and the scallop edge has been done with the Large Scallop Edgelit.  The letters are all done using the Bigz Typeset Alphabet in Riding Hood Red and sealed with Crystal Effects for impact. Project sprayed with Stamping perfume (champagne shimmer paint diluted with rubbing alcohol).
I stamped directly onto the DSP background in the rock and roll technique on this one.  The rose is made using the Fancy Flower Punch in More Mustard and the contrasting leaves are done in the same way as above.  I also cut out an acetate butterfly using the Bigz Beautiful Butterfly die.  I then ran it through the Elegant Lines Embossing Folder for texture and the jeweled body is made from Rhinestones which I coloured with a red permanent marker.  The "N" tag has Cherry Cobbler Scallop Edged Tulle and Crumb Cake Seam Binding ribbon which I have finished with a Faceted Vintage button on top of a 1/2" circle punch of Champagne Glimmer Paper and linen thread/  The daisies along the bottom are from the Paper Daisies packs daubed with More Mustard and finished with Pearls.
The Butterfly images and frame come from Papaya Collage. Butterflies are stamped in Craft Basic Black and coloured using the Regal Water Colour Crayons. The larger butterflies were created using Acetate Window Sheets and Very Vanilla card stock (stamped with the floral image from Elements of Style) - both run through the Big Shot using the Beautiful Butterflies Bigz die. The acetate was then embossed using the Elegant Lines Embossing Folder and the edges dipped in Champagne Glass Glitter (and tom bow for adhesive).  Extra large and normal sized pearls for interest. Gold leaves Bird Builder Punch and Champagne Glimmer Paper.
Background stamped with the Elements of Style flowers.  Glitter tulle made with Crumb Cake Scallop Edged Tulle, tom bow and Champagne Glass Glitter.  Buttons from the Regals collection and linen thread.  "A" Tag is dressed with Cherry Cobbler Seam Binding ribbon, Early Espresso Scallop Edged Tulle and Linen Thread along with a beautiful Antique Brad.  There is an acetate butterfly made by the same method mentioned above on the edge of the "a" as well.
"D" Tag is made the same way as "H" at the beginning with slightly different colour leaves.  "E" Tag has mustard single punch roses and little circle twirl fillers along with some Champagne Glimmer Paper leaves from the Builder Bird Punch and Cherry Cobbler Seam Binding Ribbon.  I applied the glass glitter directly to the delivery carton cardboard one I had distressed it and cut it with the Large Scallop Edgelit.  Background stamping is French Foliage.

I hope that the project has resonated with you in some fashion.

Chat soon
Shanni xx


Long Time No Blogging. . .

Sorry folks, have been absent for a month, I was preparing for the Stampin' Up! Heartfelt event in Brisbane where I had been invited to be a presenter.  It was a wonderful time and I learned a heap. Can't wait to put it into practice.

Being at presenter at Heartfelt meant lots of time creating but not being allowed to share as much as I usually would (there are restrictions on when you can share your projects).  You will be pleased to know that there is a massive backlog of projects to upload and inspire you all with. . . so stay tuned over the next few days.

I will also be doing a tutorial on rose making with the Stampin' Up! punches and flower dies.  I hope that it tides people over in their practising and that heaps of roses turn up all over cyber space very soon.

Stampin' Up! continues to inspire and amaze me - we had a wonderful gathering in Brisbane.  350 demonstrators and friends filled the rooms at the Brisbane Convention Centre for a full day of creating, sharing and inspiring.  Each event hosted by Stampin' Up! improves every time.  I am on countdown now for national Convention in May 2013 ~ we will be celebrating Stampin' Up!'s 25th Anniversary and it is going to be a blast.

Stay tuned
Shanni xx

Tuesday, October 23, 2012

A Little Bit More Vintage. . .

I am loving the new Stampin' Up! Designer Series Papers and have been trying to make myself use more than the ones that I have already established as my favourites. . . at the moment one of the frequent "go to" suites includes Fan Fair. . .

I have created a vintage card using the lovely muted regal tones in this DSP:
The colours in this paper are Riding Hood Red and Very Vanilla but in some lights there is almost a tone of More Mustard. . . so here is the card.  Riding Hood is the base cardstock, I mounted with a piece of Very Vanilla and then mounted a piece of the DSP ~ I didn;t even have to daub it - the image on the paper is muted and looks aged already!

I edged some of the beautiful Crumb Cake Scallop Edged Tulle Ribbon with Champagne Glass Glitter (using Tombow Glue) and then pleated it behind a piece of Very Vanilla which I had edged with Victoria Crochet Lace.  I had stamped the vanilla cardstock with En Francais using Not Quite Navy ink. 

The measuring tape image is from the Fan Fair designer paper set and the leaves are from a new stamp set in the Annual Catalogue, Summer Silhouettes (which I stamped in Garden Green on Very Vanilla cardstock and fussy cut out).

Made the roses with the Fancy Flower punch and then daubered the edges with Riding Hood Red ink.  The word "Happiness" is from the Loving Thoughts stamp set and I thought that a pennant would contrast nicely with the leaves and flowers. . .

Finished off with a bit of Linen Thread and some Bakers Twine in Island Indigo which almost matches the Not Quite Navy printing.

Hope that you like it
Shanni xx

Monday, October 22, 2012

Papaya Collage in Vintage Style

I love the Papaya Collage stamp set that was released in the Annual Catalogue this season. . . it has a whole heap of beautiful elements although it is difficult to use all of them at once in any one project!

Here is my vintage creation for the day.  I will be teaching this card on Wednesday night as well and hope that the galz enjoy its many elements. . .
There are a whole heap of elements on this page including the original stamping of En Francais as a background, then the frame from Papaya Collage in Craft Basic Black ink.  I daubed the edges in Soft Suede ink.  I stamped the bird and the butterflies in the the Craft Basic Black ink on a separate piece of cardstock and fussy cut them out once I had painted them with Watercolour Crayons (using the regal tones). 

I second generation stamped the fern fronds from Papaya Collage in Always Artichoke and the rose from the same set in Rose Red (one in second generation).   The musical notes from Natures pace is stamped in Soft Suede and the grapes and vine from the same set are stamped in Always Artichoke.

The greetings on this card will be written on the tag insert which I have daubered and stamped with the fern frond in the same colours as the front of the card.  I reinforced the tag with some Rose Red cardstock around the punched hole and finished it off with Rose Red Seam Binding Ribbon (which I wet and scrunched until it was distressed looking).  I sprayed the entire card with some Frost White Shimmer Paint diluted with rubbing alcohol for a luxurious finish!

See ya
Shanni x

Sunday, October 21, 2012

Vintage Flavours Everywhere

Have set myself a challenge recently to define my "style".  I love all types of cards and scrapping pages but I do find myself coming back time and time again to vintage or distressed flavoured projects. . .

Here is today's creation:
So I am planning to teach people how to make this little gem on Wednesday night this week. . . it is an unusual combination of colours but it seems to work!

Base card is Cajun Craze (cut with the Scallop Circle Original Die) and I have lined the inside of the card in Very Vanilla which I daubered with Cajun Craze to marry in.  I used the filigree stamp from Everything Eleanor and the words from Curly Cute. Jumbo Pearls give it a bit of luxe! The shape was cut using the Apothecary Accents Framelit Dies.

I ran a piece of Soft Suede through the Big Shot (gotta love that tool) using the Doilly Sizzlet and darkened the edges with soft suede ink.  I then lined the top of it with Very Vanilla again which I was tempted to stamp on but it looked too busy.  To break up all that cream though I added some Little Leaves Sizzlet punch outs in the Comfort Cafe DSP (daubered edges in Soft Suede). 

Final step was the loose rose ~ made from Very Vanilla, daubered with Cajun Craze and punched with the Blossom Punch.  Such an easy flower and quite a dramatic impact I hope.

So I am leaning towards my style being a little bit "old"?!

Until next time
Shanni xx

Wednesday, October 10, 2012

Autumn Leaves are Falling

I watched a You Tube clip by fellow Stampin' Up! demonstrator RaeDeen Bittner earlier this week on how to make the leaves punched from the Autumn Accents Original Die look realistic and here is my creation:
I love You Tube - it's where I learn most of my techniques.  There are so many talented people on the web!
So the base card is Early Espresso and I have mounted a piece of the Natural Composition Specialty designer series paper on that ~ the bark embossed one.  Next is a piece of Very Vanilla distressed and daubed with Soft Suede ink.

I have stamped the vanilla cardstock with the words and splash marks from French Foliage then stamped leaves using the rock and roll technique in More Mustard and Cajun Craze and Cajun Craze and Early Espresso.  The splash marks were stamped in Early Espresso and the words in Soft Suede.
Two of the leaves were cut out in Daffodil Delight and the other in Whisper White cardstock.  I then daubed the bottom leaf (which was Daffodil Delight to begin with) with More Mustard and Always Artichoke ink and daubed the edges with Early Espresso.  The splash stamp from French Foliage was stamped on it with second generation Early Espresso.  Scrunched it all up and made it look tired. . .
The middle leaf was also Daffodil Delight. Sponged More Mustard and Cajun Craze ink on this one.  Daubed the edges with Early Espresso and stamped off the splash marks the same as the green and brown below.  Scrunched it up too.  Scrunching makes me happy! I get to rid myself of all my tension. . .
Top leaf was Whisper White to begin with.  Daubed with Cajun Craze, Riding Hood Red and Bravo Burgundy inks and the edges daubed with Early Espresso.  All the other steps used for the others were copied here - scrunching, splashing, etc.  Stuck them all down with dimensionals.  Sprayed the entire card with Champagne Shimmer Paint diluted with rubbing alcohol.

I tied hemp twine, Linen Thread and Crumb Cake Scalloped Tulle Ribbon across the bottom and attached the sentiment so as not to take away from the design but also to look a little like it "fell" onto the card.

Enjoy!
Shanni x

Tuesday, October 9, 2012

Other Swaps at Retreat 2012

There were so many divine entries this year in the Swap Challenge at Retreat; the standard was exceptionally high.  Everyone went to so much trouble and had to make 31 identical swaps to share.  We then voted on our favourite - it was a close outcome.

Swaps are a great idea because everyone gets to take home 31 new ideas from Retreat to inspire them to create and share different projects and ideas over the coming weeks and months.

The winner again this year was Paula from paula'spapercrafting.blogspot.com with her Christmas Card entry (that's two years in a row that PFC has taken the title):
Here are some other cards that appealled to my creative muse.
Cheere created lovely texture with her card creation; a step away from her usual scrapping projects.  She does amazing work, check her out at inkitupcheere.blogspot.com for some beautiful layouts.
How cute is this image from Wonderful Winterland that Kirstyn has coloured? Love this unusual combination that really appeals to my whimsical inner child.
Michelle's "blue" take on a Christmas theme is so pretty.  Snowflake Soiree is stunning and Ornament Keepsakes is a must have stamp set for all this year's projects. Nice stamp sets to use with the telescoping technique too. Love it.
This card from Leah is just awesome - I cannot believe how much detail there is in the coloured images and the distressing would have been so time consuming.  Amazing card that is going to be a keeper in my collection.
The detail in Karen's card is breathtaking! Papaya Collage as we have not seen it before. I love the colours, the textures - gloss, shimmer, distressing and over-stamping. Yum! This card would have taken hours to create. . .
Last but not least a classic clean and simple card from Mette who does amazingly detailed work all the time. Love the colour combo of this and the tree stamp! Although it is the same technique used by Michelle above the effect is complete different. . . gotta love that!

Later
Shanni xx

Monday, October 8, 2012

Swap Design for Retreat 2012

I was really excited and organised leading up to Retreat this year and then suddenly my time evaporated and I was rushing around at the last minute. . .

This is the swap I did for this year.  The rules are that you need to use current Stampin' Up! products only. 
I wanted to make a card that would suit an anniversary or milestone birthday. . .

So the products from the bottom up are Cherry Cobbler cardstock layered with Very Vanilla.  I then mounted another piece of Very Vanilla which I had run through the Big Shot with the Lacy Brocade Embossing Folder.
The Designer Series Paper is First Edition Specialty daubed with Crumb Cake ink. The central feature is the fern from Papaya Collage stamped in Crumb Cake on very Vanilla, mounted on Cherry Cobbler and the lace edge running down each side is Victoria Crochet Trim.
The feature rosette is made from the lacy circle from the Perfect Pennants Die in Cherry Cobbler.  I have layered this with a 2" circle punch out of the Champagne Glimmer Cardstock from the Holiday Catalogue which I adore and a Circle Scallop punch out which I have daubed with Crumb Cake.
The sentiment on the pennant comes from Loving Thoughts and I have embellished the Antique Brad with Cherry Cobbler Scalloped Tulle Ribbon, Crumb Cake Seam Binding Ribbon and Linen Thread.

Of course the whole project had to be sprayed with Champagne Shimmer Paint diluted with rubbing alcohol for that extra bling.

Lovin' it!
Shanni x

Saturday, October 6, 2012

Decorated Tins for Stampin' Retreat 2012

You will have seen from my previous post that I put together a few surprises for the people attending my annual retreat.  Here are a few more of the decorated tins:
Summer Smooches DSP is fast becoming my go to paper for bright thank you and birthday cards.  Here I have teamed the paper with flowers punched using the Boho Blossoms punch in Real Red, Daffodil Delight and Island Indigo - gotta love the bling diamente jewels too.  The leaves are in Lucky Limeade from the Little Leaves Sizzlet die. The ribbon around the top of the tin is the Island Indigo Ruffled Ribbon which is available in the 2011 In Colour range.
Another tin covered using the Summer Smooches DSP range and punched out flowers - oops! See the crooked diamente!  Should have better quality control systems in place. . .
Twitterpated DSP (just for a change) coupled with an image from the From My Heart stamp set, embossed with Cherry Cobbler embossing powder.  I daubed the edges of the Labels Collection Framelit Die shape with Not Qite Navy fading off to Island Indigo to match in with the fine blue lines in the DSP.  Gotta love the Cherry Cobbler Seam Binding Ribbon.
Summer Smooches again and ditto to the previous two tins above using the same designer series papers.  Love the fresh bright colours in this range.
Summer Smoothes DSP again! Coupled with a Daffodil Delight Labels Collection Framelit Die (which I coated with Crystal Effects) and a stamped image from From My Heart stamp set stamped in Island Indigo that I took the time to fussy cut out.
This paper range is from the Summer Smooches range.  I made this tin especially for a freind who adores blue! The stamped images are embossed using versamark, Island Indigo ink pad and clear embossing powder.  The images are from the Affection Collection stamp set and I have fussy cut the images post stamping.
The expression on the top is from the From My Heart stamp set! I love this sentiment!

Enjoy!
Shanni xx 

Stampin' Retreat Treats 2012

A group of 30 crafty people attended my annual Stampin' Retreat this year at Tinaroo and as always I put together a stash bag of Stampin' Up! goodies for people to play with over the three day weekend although I have to admit that lots of people don't discover what is in their bag until they get home and unpack. 

This years stash bags included a stamp set, designer papers, dazzling details, pens and a simply sent kit along with a heap of project ideas and off the page items.  I always make something unique for all the attendees and this year was not different.
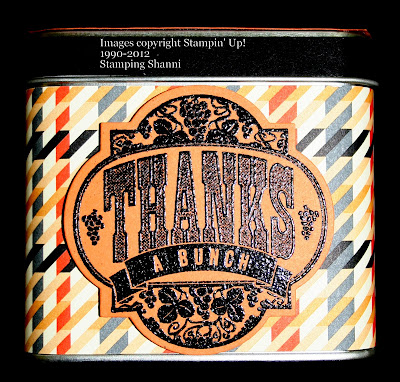
So there were only a few double ups but everyone received a decorated tin filled with chocolates.  This is an example of one made with Twitterpated DSP.  The label is from the Friendship Preserved stamp set which I stamped and embossed with the new pewter embossing powder - yum! The image was then cut out using the co-ordinating Window Frames Framelit Die.
Here is the same stamp set image done with black embossing powder. The background is Howlstooth & Scaringbone DSP.
And the top of the tin was stamped using the maple leaf image from Gently Falling.  I embossed the image with black embossing powder and coloured the image using More Mustard and Pumkin Pie ink and a dauber.
Another tin decorated with the Twitterpated DSP (I love this paper suite as it is so versatile and the variation in designs and colours are gorgeous).  The image is from the Friendship Preserved set, embossed in pewter embossing powder and cut out with the co-ordinating Window Frames Framelit Dies.
Some of the galz who came on retreat love their butterflies so this paper from the Patio Party DSP range seemed the perfect choice.  I have coupled it with the image from the From My Heart stamp set which has a wonderful collection of sage advices.  The butterflies were cut out using the Beautiful Wings embosslit die.
Twitterpated DSP is one of my all time favourite papers released by Stampin' Up! and I married it here with an image from the Fabulous Florets stamp set.  The Little Leaves sizzlet die and the Labels Collection Framelit Die seemed the perfect accessories to balance the whole project.
My eldest daughter is allergic to cherries and unfortunately they are my favourite fruit so I am forever stamping images of the ruby beauties for her as we have decided if she can't eat them at least she can look at them! So this is one of my favourite tins.  The pretty red and white polka dot paper is from the Summer Smooches DSP range.  The stamped image (which is embossed with Cherry Cobbler embossing powder) is from the Mouthwatering stamp set. And the white framed background is from the Labels Collection Framelit Dies.

I'll share a few more of the treats in my next blog.  Hope that you gained some inspiration.

Cheers
Shanni xx

Thursday, October 4, 2012

Spools of Fun!

Howdy Peeps been busy with school holidays and lots of other things like my annual Stampin' Retreat. . . will post some photos soon.  Had a brilliant time with heaps of creative people, not much sleep and lots of laughs.

Big NEWS of the moment. . .

Stampin' Up! has outdone itself with a promotion for October. . . a free spool of the new 2012 In Colour stitched satin ribbon with every purchase over $60!* 
So if you place an order this month for say $125 you are entitled to two spools, $180 means three spools etc.  You get my drift. . .

And the great part is that the ribbon is divine! I love this ribbon it is so luxurious and comes in five beautiful colours - Gumball Green, Midnight Muse, Primrose Petals, Raspberry Ripple and Summer Starfruit (which is a fresh green colour, not yellow as everyone presumes). Of course it matches the new In Colours perfectly and that means easy to combine and match projects - Yay!
There is over 9 metres on every spool.  The satin ribbon is fantastic for bows and knots and sits perfectly on all projects.  The other amazing attribute is that it is nice and light so it won't weigh your projects down - Stampin' Up! are really clever about their embellishments. . . they are always thinking of ways to help their customers.

Another neat thing is that the ribbon is 1cm wide (3/8") and has four rows of evenly spaced white stitching through the centre of the ribbon that makes for a great contrast and helps to marry it in with projects.
So contact me today to place your order.  I can have your products shipped directly to your door without any fuss or delay.

Spool-delicious!
Shanni xx
* Unfortunately this offer is only open to Australian residents.  Apologies for any inconvenience caused.

Friday, September 7, 2012

Betsy's Blossoms & DS68

Busy week because the Stampin' Up! Annual Catalogue and the Holiday Catalogue both launched on 1 September! Wow! There are some beautiful products, papers and tools in both of these catties. . . If you would like to purchase anything that you see contact me and place your order today.  Products can be shipped straight to you without delay.

So not much time for creativity. . . have made a few cards with the Betsy's Blossoms set though. Here is one that I am entering in the Deconstructed Sketch #68 challenge this week - check it out at the Deconstructing Jen blogspot - there are always great entries.
The card base is Whisper White which I have framed on the back and front with Daffodil Delight.  The Designer Series Paper running down the right hand side is Floral District which is a bold and busy paper selection with colours like Rich Razzleberry, Lucky Limeade and Rose Red in its pallet. 
I have stamped the Daffodil Delight with the trio of flowers from Betsy's Blossoms in Whisper White craft ink to break up the colour a bit.  The scallop edge running down the right hand side is from the Tasteful Trim Bigz XL die and the doily shaped mount behind the stamped image is cut from the Paper Doily Sizzlet.  I mounted the stamped images on a 2 1/2" Circle Punch and cut the white circle slightly smaller free hand.  I then stamped the circle with the single flower image from Betsy's Blossom in Daffodil Delight ink.
The bird is stamped in Primrose Petals ink twice (I cut the wings from the second image and popped that wing with dimensionals) and the leaves are stamped in Gumball Green ink - both colours are new In Colours for 2012.  I then fussy cut the images and have mounted them on dimensionals.  I couldn't resist using Crystal Effects on the images to pop them a little.

The sentiment is stamped in Gumball Green and punched out using the Oval Punch, mounted on Daffodil Delight punched with the Scalloped Oval Punch. Mounted it on dimensionals to bring the whole thing together.

Enjoy your weekend!
Shanni xx

Friday, August 31, 2012

Vintage Card for Deconstructed Sketches Challenge

I was surfing the net today to get some inspiration for my Retreat swaps (which I still haven't started!) and discovered a relatively new site called Deconstructing Jen - it has a Sketch Challenge that looks really neat and not too hard to comply with.

So here is the sketch challenge this week:
And here is my interpretation of it:
My base card is Soft Suede and I have mounted some Attic Boutique Designer Series Paper on Crumb Cake (stitching around the edge in aqua cotton).  This paper is a lovely design and very vintage in its theme but the difficulty is that it is hard to match romantic colours to it. All other cardstock on the card is Very Vanilla. I had lots of new toys to try out including stamps, a new embossing folder and Jumbo Sticky Rounds which are coming out in the Holiday Catalogue tomorrow.
The Textured Embossing Folder is called Lacy Brocade and I am officially in love!  I have used it on about 15 projects and have only owned it for a week! Because textured cardstock is often hard to adhere things to I used the Jumbo Sticky Rounds because they give more coverage than snail and sticky strip.

Stamps in this project include the divine new Papaya Collage which will be released in the Annual Catalogue in Australia tomorrow (yyaaayy!).  French Foliage, an all time favourite of mine along with En Francais and Creative Elements.  And Sincere Salutations which retires as of midnight tonight.

I stamped the smallest leaf from French Foliage and fussy cut them out, then distressed them to sit behind the flowers.  Because the flowers blended into the page a bit I popped a bit of torn Gumball Green cardstock behind the flowers as well which I distressed and damaged first - can't help myself! And because the embossed card ran behind the flowers I made the beige flower from Sahara Sand cardstock to make it pop a little.
So all the stamping has been done using my Soft Suede classic ink pad.  I stamped the fern leaves from Papaya Collage ~ but I stamped it off first so the darkest image you see above is actually a second generation stamped image, followed by third and fourth.  I tore a post-it note down the sides, stuck it in the middle of my tag and then stamped it with En Francais so that the italic words would only be on the edges. 

The Pool Party cardstock behind the tag is stamped using the filigree stamp from Creative Elements around the edges.  I could not resist daubing and distressing the card before mounting them.
The darker brown card behind the blue is Soft Suede and I stamped it using bleach and en Francais as I only wanted a hint of writing to lend in with the designer paper.  The stained the lace with black tea and possibly should have rinsed it out a bit more as it is quite brown.  I made the tag shape myself and added a Soft Suede 1/2" circle then punched out the centre with the Cropodile and threaded it with Pool Party Seam Binding.

Happy crafting,
Shanni x