Thursday, May 20, 2021

Totally Techniques - Baby Wipes Inking

Thanks for stopping by for another Totally Techniques Design Team blog hop! This month we are highlighting baby wipe stamping, some may also refer to it as baby wipe inking.

Here’s a great link to a quick YouTube tutorial Beata Johns from SplitCoastStampers that explains how to do the technique.

These are my projects:

These are the stamp sets and materials used for the first card:

    All Things Fabulous
    Beauty of Friendship
    Whisper White Card stock
    Blackberry Bliss Card stock
    Blackberry Bliss Classic Stampin’ Ink Pad
    Pumpkin Pie Classic Stampin’ Ink Pad
    Real Red Classic Stampin’ Ink Pad
    Bark 3D Embossing Folder
    Meadow Dies
    Classic Stampin’ Re-inkers — So Saffron, Daffodil Delight, Bumble Bee, Real Red, Cherry Cobbler,     Rich Razzleberry, Blackberry Bliss, Pear Pizzaz, Old Olive and Mossy Meadow
    

These are the stamp sets and materials used for the second card:

    Beauty of Friendship
    Pear Pizzaz Card stock
    Whisper White Card stock
    Blackberry Bliss Card stock
    Blackberry Bliss Classic Stampin’ Ink Pad
    Meadow Dies
    Classic Stampin’ Re-inkers — So Saffron, Daffodil Delight, Bumble Bee, Real Red, Cherry Cobbler,     Rich Razzleberry, Blackberry Bliss, Pear Pizzaz, Old Olive and Mossy Meadow

Obviously I used the same re-inkers and in fact I used the same baby wipes for both projects. This is what the inked up baby wipes looked like. I layered the baby wipes on a flat plastic lid.
For the first card I used a 6” x 6” Whisper White base mounted with a square of Blackberry Bliss, I then mounted that layer with a square of Whisper White which I embossed using the Bark 3D folder.
I stamped the flowers from All Things Fabulous (which are actually three step stamp images) on Whisper White. The first layer was stamped using the baby wipes ink combo. I randomly picked up the merged colours from the baby wipe ink base and was happy that they were a variety of tones. Second step stamp was done using Pumpkin Pie ink pad and the third step was done using the Real Red ink pad. I fussy cut the flowers.
The leaves were stamped from the All Things Fabulous set using the baby wipes. and I kind of liked how there was purple and green tones. These were easy to fussy cut.
Because the flowers and leaves were so busy I wanted to keep the card as simple and stark as possible. I clustered the flowers together and raised two of them with dimensionals. I cut a couple of the leaves apart to make them all look different and nestled them randomly.
Stamped in Blackberry Bliss, the sentiment from the Beauty of Friendship set contrasts nicely with the multicoloured flowers and leaves. I framed the words using the Meadow Dies and mounted the cut out on a rectangle of Blackberry Bliss for drama.
The second card is a 6” x 6” Pear Pizzaz, mounted with a square of Whisper White then with another square of Pear Pizzaz. If I made this card again, I think I would stamp the top card with some random sparse flowers, dandelions or thistles.
To create the wildflowers I lay Whisper White card directly on the inked baby wipes and rubbed the card to encourage the absorption of colour. I then cut the flowers using the Meadow Dies and arranged them randomly on the Pear Pizzaz base card. Some are flush with the base and others dimensionalised.
I quite like the stippled colour and combinations which look abstract and at the same time are clearly meadow flowers.
I tore the green inked card to make the ground beneath the sentiment simply because I had some mossy meadow inked card left over.
The sentiment from the Beauty of Friendship set was stamped in Blackberry Bliss on Whisper White and hand cut and mounted on Blackberry Bliss card for contrast.
I hope that you will consider trying this technique as it’s simple and impactful.

Don’t leave us yet, there are so many different projects using this technique, my good friend Zoe Tant in the UK did the most beautiful project!

I hope you get inspired.

Stay glittery,
Shanni xx

Order of Totally Techniques Design Team Blog Hop

Zoe Tant United Kingdom
Nadine Weiner Germany
Kelly Acheson United States
Barbara Meyer Austria
Annette Elias Netherlands
Shannean Moncrieff Australia (that's me!)


Saturday, April 24, 2021

Fancy Folds - Interactive Wiper Card


Welcome back to another Fancy Folds Design Team blog hop -- this month we are featuring Interactive Wiper Cards. I hope you have enjoyed the beautiful project by my friend Gina from the United Kingdom - I loved it! Gina is so clever!

This is my card:

I followed the really easy to understand YouTube tutorial from Beate Johns and opted for the square card option.

These are the products I used for my project:

Quiet Meadow stamp set
Tasteful Touches stamp set
Thick White cardstock
Basic Black cardstock
Real Red cardstock
White cardstock
Window Sheet
Soft Suede Classic Stampin' Ink
Crumb Cake Classic Stampin' Ink
Early Espresso Classic Stampin' Ink
Memento Tuxedo Black Ink
Stampin' Blends
  Dark Cherry Cobbler
  Light and Dark Poppy Parade
  Dark Daffodil Delight
  Light and Dark Old Olive
Champagne Rhinestones
Double Oval Punch 
Blending Brush
Card base is thick white cardstock. I layered the featured area of the card with a square of real red, then basic black cardstock and the stamping layer which is standard white card. I stamped the background images directly onto this top layer -- the lace from the Tasteful Touches was stamped in Crumb Cake, the square tile replicated image and the background sentiment in Soft Suede and the "fly poo" in Early Espresso.
I stamped the background flowers three times and the three individual flowers (from Quiet Meadow which is in the new Annual Catalogue - eek!) on a separate piece of white card in Memento Ink. I coloured them with the nominated Stampin' Blends and fussy cut them all out. The sentiment from Quiet Meadow was also stamped in Memento Black, punched and mounted.
You will see that I have shaded all of the flowers with the three Stampin' Blend reds. The leaves were done with both Old Olive Stampin' Blends. I cut up one of the background flower bunches so that the smaller flowers would look more random, you will see that I also nestled one bunch a bit higher on the card.  I also cut one set to use on the "wiper" aspect of the card.
The wiper part of the card is created using a Window Sheet so that the flowers appear suspended above the card proper. The flowers are adhered using glue dots. I added Champagne Rhinestones for a touch of bling.
The rear of the card is also mounted in the same manner as the front with the side panels just white on basic black card. The little bit of card peeking above the top of the card is the background flowers on the front of the card. I considered chopping the little bit off but I like how the front of the card looks more ad hoc.
The front of the card has two panels as well for uniformity, I decorated them with the square tile stamp from the Tasteful Touches and added the tone to the edges with the Blending Brush.

This is a relatively simple card with a bit of a wow. I like that the wiper could be added from either side depending on where you feature the images. I hope that you are inspired to give the fold a go!

Stick around because we have some beautiful projects from the rest of the team, but hop along now to my friend Mary Ann in the USA! Mary Ann's project is awesome as always!
We love your support!

Stay glittery
Shanni xx


Order of Our April Hop
Nadine Schweda (Germany) not participating this month
Aude Barbara (France) not participating this month
Fiona Carson (New Zealand)
Gina Connor (United Kingdom)
Shannean Moncrieff (Australia) that's me!
Mary Ann Rossiter (United States)
 Astrid Hoffmann (Austria)
Stephanie Nash (Canada)
Miranda Mols-Heidnrath (Netherlands)


Saturday, March 27, 2021

Totally Techniques - Using Stampin' Blends

Welcome back to another Totally Techniques Design Team blog hop! This month we are highlighting Stampin' Blends, which are some of my favourite tools in the Stampin' Up! collection!

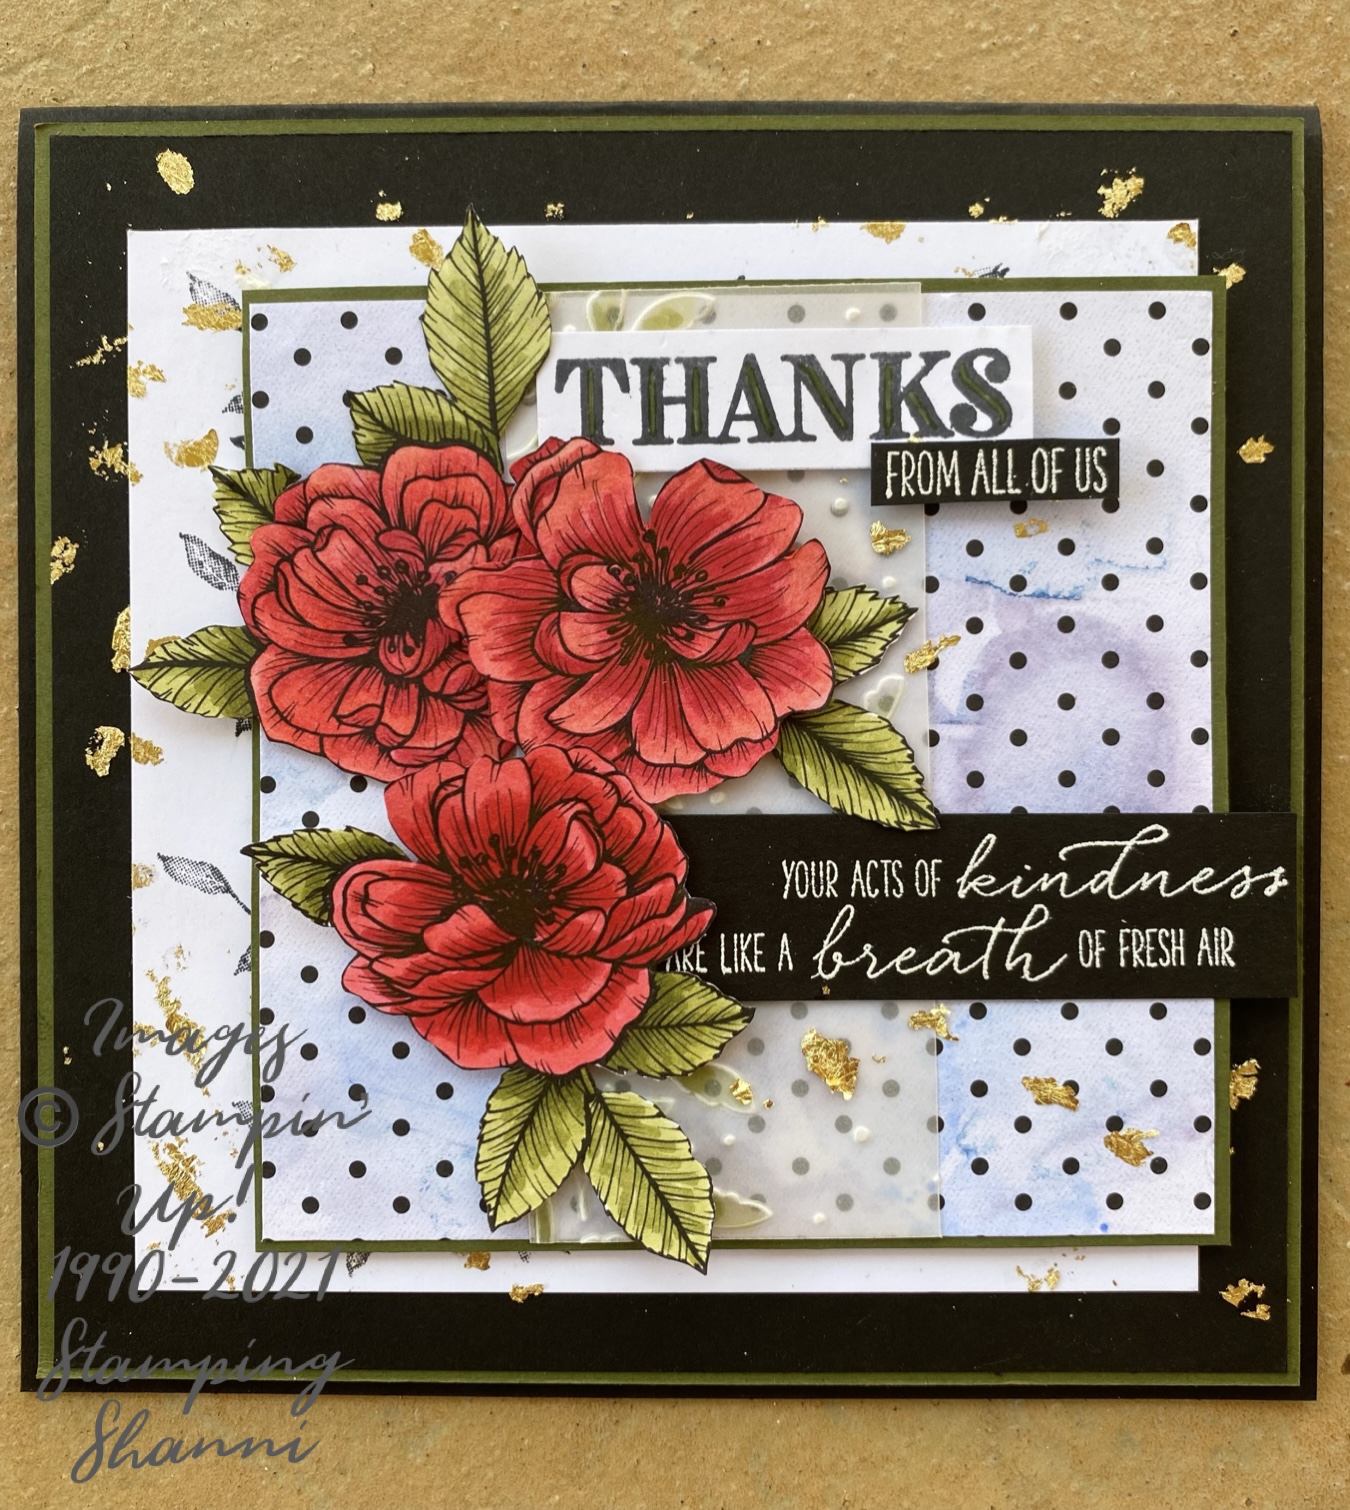
This is my project this month:

You can probably see that it is a square card 6"x 6" and features a number of materials, stamps and tools. 

This is what I have used:

Basic Black cardstock
Mossy Meadow cardstock
Whisper White cardstock
True Love Designer Series Paper
Vellum cardstock
Window Sheets
Meadow Moments Embossing Folder
Very Versailles stamp set
Garden Wishes stamp set
Ornate Thanks stamp set
Versamark Ink
Memento Tuxedo Black ink
Gilded Leafing Embellishment
Heat & Stick Powder
White Stampin' Emboss Powder
Stampin' Blends 
    Dark and Light Real Red
    Dark and Light Poppy Parade
    Dark and Light Old Olive
    Dark and Light Night of Navy
    Dark and Light Balmy Blue
    Dark and Light Pretty Peacock
So the base card is Basic Black, mounted with Whisper White inside, and with a square of Mossy Meadow, then Basic Black on the front. 

The feature area is a square of Whisper White, which is stamped with the leaf image fromVery Versailles stamp set in Memento Black. I then mounted a sheet of the True Love DSP which I treated using Stampin' Blends and rubbing alcohol. I embossed a piece of Vellum card stock with Meadow Moments embossing folder.

I thought I would show you a different way to use the Stampin' Blends. A great use for subtle backgrounds when you don't have the right colours for a watercolour background.  All you need is:

Window Sheet (clear acetate sheet)
Stampin' Blends (I used blues on this occasion)
Rubbing Alcohol
True Love DSP
You simply scribble the Stampin' Blends on the  window sheet randomly, then sprinkle with rubbing alcohol. The faster you do this the better the colours will blend and attach to your card. You lay your card on the acetate sheet and rub the back of the card to pick up the colour. Your card will get a bit damp. Leave it to dry thoroughly.
You can see that I didn't go to too much trouble. You can use the same scribbled colours again, just add more rubbing alcohol. It leaves a light but distinct water colour like effect on your card.
I like it because its subtle but at the same time adds a different interest and focal point to the card. It works even better on light coloured cardstock.

Vellum is under-utilised and I love it because its light and add texture and layers to my cards. For today's project I embossed the vellum using the Meadow Moments embossing folder.
Once I had embossed it, on the reverse side (so the side that is impressed), I coloured the leaves using the Dark and Light Old Olive Stampin' Blends. It makes the vellum look like stained glass from the other side. It's not hard to do and a great technique using Stampin' Blends. It would well on bouquets of flowers and Christmas cards.
For the flowers - fussy cut three separate flowers from the True Love Designer Series Paper from the Occasions Mini. I adore this paper and think that it makes a great background and feature on all projects.
The flowers are very forgiving to colour, you can make mistakes and you can barely tell that you did! I coloured using the Real Red and Poppy Parade Stampin' Blends for the flowers and the Old Olive blends for the leaves. As I mentioned. I fussy cut them and I moved a couple of leaves around because I wanted to balance the composition.
The top left flower is glued directly to the card and the top right and bottom flowers are attached using dimensionals. The leaves on the top left have been cut from another area on that flower and have been stuck direct to the card beneath the flower. The little leaf facing 11 o'clock on the top left hand flower was cut off the flower image of the top right flower.
I did a combination of sentiments. I heat embossed the white on black cardstock using the sentiments from the Garden Wishes stamp set. I cut the sentiments to size. If I made this card again, I would move the flowers a little more to the left so the sentiment fits better. The "thanks" is from the Ornate Thanks stamp set, stamped in Momento Black on white card. I coloured the void in the middle of the letters using the Dark Old Olive Stampin' Blend pen.
Final step was to add some bling, I added random gold leaf with the Gilded Leafing Embellishment and Heat and Stick powder. I kind of tapped the Versamark ink on the card on its corner, added the heat and stick and then followed with the leaf. I use tweezers to remove from the jar and apply. 
An unusual combination of stamps, techniques and uses of the Stampin' Blend pens, which I hope inspires you to take a look. I love Stampin' Blends, because I love to colour in. They are a relaxing and forgiving colour tool to use. I always start with the dark tone, I use them sparingly because it's easier to add colour than take it away and then I add the lighter tone next.
Stick around and check out our other Design Team projects. They are so inspiring!

Until next time,
Stay Glittery,

Shanni xx


You are invited to the Inlinkz link party!

Click here to enter

Saturday, January 30, 2021

Totally Techniques - New Blending Brushes from Stampin' Up!


 Welcome back to another blog hop with the Totally Techniques Design Team, this month we are featuring blending brushes from Stampin' Up!, you will see we have all used the tools slightly differently.

This is the Blending Brush which is new in the Occasions Mini Catalogue:

This is my card:

This is a square card using the following:

Friends Are Like Seashells stamp set
Happy Thoughts stamp set
Crumb Cake card stock
Pool Party card stock
White card stock
Memento Tuxedo Black Ink
Crumb Cake Classic Ink
Pool Party Classic Ink
Dark and Light Balmy Blue Stampin' Blends
Light Pool Party Stampin' Blends
Dark and Light Soft Suede Stampin' Blends
Dark and Light Petal Pink Stampin' Blends
Timeless Label Punch
Gold Hoop Embellishments
Champagne Rhinestones
Shimmery Crystal Effects
Blending Brushes
Bone Folder
Dimensionals
Crumb Cake base mounted with a square of Pool Party card stock, then with a square of White card stock. I immediately applied Pool Party with the Blending Brush to identify where I wanted the centre of the images to be. I applied the Crumb Cake with the blending brush after I had adhered the shells, and I used the top edge of the brush if that makes sense?
The shell images from the Friends Are Like Seashells set are all stamped on White card using the Memento Tuxedo Black ink and colouring them with Stampin' Blends. 
I fussy cut the shells and then shaped them by stretching the card with a bone folder from the back and then kind of traced the shell lines to be able to bend the card in the rounded and grooved shape of the shells.
I adhered the shells to the card using dimensionals (sometimes as many as 3 at a time). The Hoop is adhered with a small glue dot.
You can see the dimension of the shells off the card. I then covered the three shells with Shimmery Crystal Effects; I like the glossy effect and it helped make the cards look a bit more realistic. The touch of glitter in the crystal effects is also really pretty and lends a consistent theme to the rhinestones. I left the mermaid penny nude.
The small glistening spots highlight the dimension of the shells as well. Once I had stuck down the shells, I added the Crumb Cake ink with the Blending Brush. I then stamped the stipple image from the Friends Are Like Seashells set in black. 

I hope you have felt inspired by this card. The Blending brushes are easier to use than daubers or sponges and allow you to apply dense or fine colour. The sentiment from Happy Thoughts  is stamped in black on a scrap and punched using the Timeless Label Punch, brushed with some Pool Party ink, mounted with dimensionals.
Until next time! Thanks for stopping by.

Stay glittery!
Shanni xx


You are invited to the Inlinkz link party!

Click here to enter

Monday, November 2, 2020

Totally Techniques - Stamping with Embossing Folders


Welcome back to another Totally Techniques international blog hop. I have been very tardy with this group this past 6 months and hope to redeem myself this month.

This is my card:
I love textures, distressing and layers in my cards so this technique really appeals to me. I am also conscious that people are looking for ideas for Christmas so I know that this card layout will come in handy with say a poinsettia flower arrangement or holly and pine cones. . .
These are the materials used:-

Tasteful Touches Stamp Set
Textured Essentials Stamp Set
Basic Black Cardstock
Crumb Cake Cardstock
Whisper White Cardstock
Copper Foil Card
Memento Tuxedo Black Ink
Crumb Cake Classic Ink
Soft Suede Classic Ink
Versamark Ink
White Stampin' Emboss Powder
Pinewood Planks 3D Embossing Folder
Tin Tile 3D Embossing Folder
Retired Heirloom Frames 3D Embossing Folders
Gold Hoop Embellishments
Champagne Rhinestones
Scalloped Lacetrim
Poinsettia Dies (from the Holiday Cattie)
Light and Dark Cherry Cobbler Stampin' Blends
Dark Poppy Parade Stampin' Blends
Dark Daffodil Delight Stampin' Blends
The card is a square card in basic black, mounted with a square of crumb cake card which is stamped using the "pinewood planks embossing folder" in crumb cake ink. I also stamped the little square texture stamp from the Textured Essentials stamp set in soft suede ink for some added vintage appeal.

The copper foil sheet was embossed using the tin tile embossing folder. I distressed the edges and then added some oxidisation with soft suede ink around the edges to give an aged look. I added the lace trim to the back as I wanted the card to have a feminine feel. The heirloom frame was embossed and fussy cut from whisper white and I sponged the edges with soft suede ink to marry into the vintage frame.
The flowers are stamped in memento ink on whisper white and coloured with the Stampin' Blends listed above. I cut the little black leaves with the Poinsettia Dies in basic black card. The rhinestone and hoop add the extra bit of luxe!

This was a really quick card and I hope it still has wow factor. I plan to use it for my daughter's 16th birthday next week but I will copy the layout for Christmas cards for the season.

Until next time,
Shanni xx


You are invited to the Inlinkz link party!

Click here to enter